About Me

I've been taking things to bits, and making things ever since I can remember, starting with dismantling knackered alarm clocks and watches and helping my dad fix the car. Now I have a well-equipped workshop and have aquired lots of new skills, so I can make better stuff. When they first appeared, I became involved with personal computers, and these and developments in electronics have increased the scope of the things that I can do. Just recently retired, so O yes, now I can make all sorts of stuff.....

Sunday 19 October 2014

The Copper King of Middlezoy

Well its been a bit frantic round these parts over the past few weeks, mainly with the postman bringing fresh supplies on a regular basis, and me hammering away in the workshop pretty much non-stop.

First up is all things copper.  I made a few of my copper birds following the original one that I made for the arts festival (sorry to say that the original has suffered  from a few spectacular crash landings and is now parked in a corner while I decide what to do with it.  Demand for these birds has continued, and to date I have made eight, with another one due to be finished next week.  They are  a bit fiddly to make with my fat fingers, and the heads are always a bit of a challenge, so every one is different in some way to its predecessors.  I like making them, but a bit of a change is in order, so....

... I made some flowers out of copper instead.  These are much easier to make than the birds and the colours that the copper takes when heated up seem to suit flowers well - colours vary from a pale straw through orange, then purple, bluish silver and last a pale gold.  A bit more heat turns the copper a pale pinky gold, and there it stays no matter how hot it gets.  Dipping the piece in vinegar for a few minutes cleans off the colours, and I have accidentally produced some interesting patterns and textures by heating up a cleaned piece while the vinegar was still on it.  It seems that the oxide colours are refractive, which is why they go dull when the piece is handled - greasy fingers reduce the refraction effect - or when sprayed with a protective laquer.

Flowers are great, every one is different so a lot more creative satisfaction in making them.  So much fun that I tried a different subject - butterflies.  These are even easier than the flowers and the wings show off the colours really well.  The wings are copper foil, of course, the bodies are a bit of brass rod with the ends rounded off in the lathe, and the legs are made from fine electrical wire stripped from some old cable that I had hanging around.  Recycling?  I do it every day :-)

A potentially good development has been the finding of a 'artisan studio' to put some of my stuff on display.  She has some of the flowers and butterflies, as well as one of my jewellery boxes and a shoji-style table lamp.  Its early days (the stuff has only been there for a week) but we may see some of the pieces march out the door as Xmas approaches.  Watch this space.

The original wall lamp
In between copper things, I have been sending clouds of sawdust over the village as well.  I made a wall lamp a while back in a sort of Japanese 'shoji' style:  its made in cherry with the shade made from some hand-made textured paper which looks particularly good with the light behind it.

Jon and Katie liked the lamp, so I made them a pair in light oak for the bedroom.  My lamp is switched on and off by the Arduino/Home Easy control box, and it doesn't have a switch of its own, but the new pair have a pull-cord switch built into each one.
Jon's oak wall lamps

The new hanging lamp
While moving these new lamps around, I happened to put them back to back and this gave me an idea for a hanging lamp.  We have been looking for a lamp to hang in the hall ever since we built the house ten years ago, and all this time we've had a cheapo Ikea paper shade which looks rubbish.  I managed to pick up some more cherry wood at a good price recently, so I attacked it with my little hammer and produced a new hall lamp.  In the workshop it looked huge, but hanging in the hall the proportions seem just about right and its a massive improvement over Mr Ikea's paper ball affair.

There's been some action in the garden as well, in the form of badgers.  I like to see them shambling around, but they are particularly fond of greengages which fall off the tree at the end of the garden.  Badgers make a JCB look like a wuss when it comes to digging, so keeping them out is a bit of a challenge - they seem to come in at one point and then look for another way out, and if there ain't one handy, they set to work and make one.  In the past we've used rags soaked in Jeyes fluid which stopped them (while making the garden stink like a Portaloo), but this didn't work this time and nor did the creosote applied by the Man At The Back.  A detailed search of the interweb yielded the idea that badgers are put off by the pee of larger animals, including humans, so a few trips into the bushes at dusk each night and it seems to have worked!  Have to repeat the treatment after rain, but I'm hoping that if they get used to finding their dinner somewhere else that they will not return.  Watch this space, I'm not particularly looking forward to the nightly application in January...

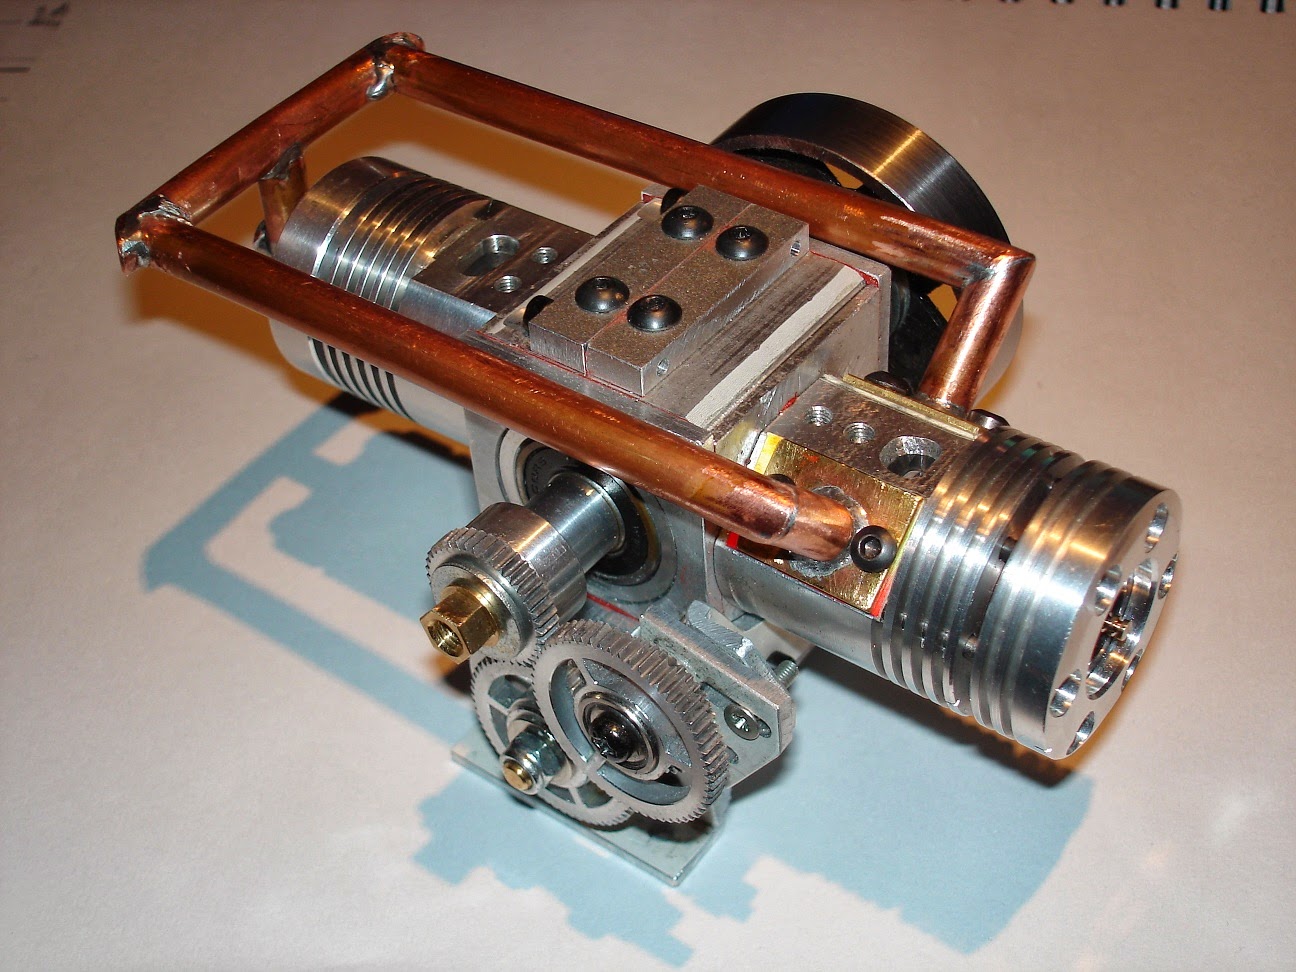
Now that the copper and wood dust has settled I've made a new start on the engine.  I've been trying to find a couple of old paint cans to use as the basis for a small furnace to make the castings and only recently managed to locate some, thanks to George at the pub - George is a true son of Somerset, and although I grin and nod when he talks to me I have absolutely no idea what he is saying, so a 2 way conversation is a bit tricky.  I've made a couple of simple patterns and will try some melting as soon as the weather dries up a bit.  In addition, I've cashed in the £25 reclamation yard voucher that I won at the Arts Festival and secured a couple of cast iron sash weights (ideal for the cylinders for the new engine) and a small Siddhartha statue for the garden.

New oil pump for The Beast
As a start I've finished making the oil pump.  This will be a fairly serious engine with a capacity around 45cc, so it will need a bit of pressurised oil to stop the bearings from bursting into flames.  I made a pump for the original engine, but I'm not sure if it worked or not as it leaked oil from every pore and there probably wasn't enough pressure left to do any good.

The new pump is a big 'un.  The body is machined from a 20mm thick block of alloy, and it has a pair of 28mm diameter glass filled nylon gears to do the pumpage.  The tolerances are pretty tight, otherwise the gears just stir the oil without pumping it, and one of the gears was made slightly off centre with its bore so I had to do a lot of fettling with swiss files to get the gears to mesh properly and spin in the housing.  The drive shaft has proper bronze bushes for bearings, and a real oil seal to keep the juice from squirting along the shaft.  Finished it today, assembled and immersed it in a tub of oil and cranked it over with the power drill (note to self - use the slow speed next time).  Once I cleaned up the mess I was quite pleased, it produced an impressive jet of oil out of the outlet and didn't seem to leak.  Hooray!

I started tae kwon do training again a couple of weeks ago, after more than 18 months of doing very little, but I think I'm going to have to look for a new club - the old one only has 5 or six people training and unless they round up a few more punters its going to fold.  The last session I went to, I was the only one there, so I'm going to check out the club where Jon trains next week.  On the plus side, I managed to survive the training sessions with nothing worse than a bit of stiffness.  My martial arts training is taking a bit of a dive overall, as my tai chi instructor is heading off to Bali at the end of the month to start a sailing school there, and I don't think the replacement instructors are anywhere near as experienced, unfortunately, and there's only a few students so I don't expect that one to last long either :-(

And last, went karting last weekend.  Had a pretty good day, didn't win anything but managed an 8th place out of 13 and stayed with a couple of the boys for most of the laps.  Then came the final, and with it the rain.  Just enough time to slap on the wet tyres before the race and we were off - last time I drove in the wet it was like driving a speedboat with a broken rudder, but the changes I made to the front track a few months ago made the old girl a bit easier to handle and I managed to go reasonably quickly without falling off.  I got overtaken on the straight a couple of laps before the end while drifting over to the right to get a better run at the next corner and just in time saw the other punter out of the corner of the visor as he took to the grass.  Wet grass at 60-odd mph is not a good combination but with a few wild swings he managed to get it back on the black bit, an excellent save on his part.  It was so wet, and getting very dark, that they stopped the race a few laps early - thank goodness for the wet suit I was wearing, and for the dry clothes that I always take with me.  

That's pretty much the news for now.  Next month I hope to be able to report progress on the casting malarkey and if that goes OK I will be machining cylinder blocks, crankcases and pistons like a man possessed.  Hoo-raw

Thursday 31 July 2014

Ahem....... award winning artist

Its been frantic here over the past couple of months, and continues to be so.  In no particular order, off we go.

First up, the Middlezoy Arts Festival.  This was the first go at a new 2 day event for the village, and I have to say that it was a great event and very well organised by all the volunteers - so much so that a) they made a small profit, and b) it will run again in June or July 2016.  Full details on their web site here:-middlezoyartsfestival.org.uk.  
I was asked to show a few of my bits and pieces (stop sniggering at the back) so I turned up with various wooden creations and my glass engraving - tried to do some live engraving, but kept being interrupted by the punters so the glass never got finished.  The weather was good, the crowds could have been bigger, but I had a lot of fun and met some nice and interesting people.  I shared a space with a local artist, Simon Watson, who shares many of my interests in machines, old cars, dusty mechanical ruins in barns and so on, and he has asked me to join up with him at the annual Somerset Arts Week 'open studio' event next year - we will apparently be showing our stuff in the village church, more details on this when we get it.

Snaliens and the Captain's log
The Arts Festival also had a garden art competition, so we set up two exhibits - the "Snaliens" one uses real snail shells that we brought back from South Africa and which have been collecting dust in a cupboard ever since, as well as a log garden made out of the hollow trunk of an ancient plum tree that blew down in our garden last winter.  The other one is a bird and flower made from bits of copper foil mounted on a copper wire framework and dangling off a straightened coat hanger, and to my absolute gobsmackedness it won first prize - hence the 'award winning artist' bit, which I will quote extensively from now on.

The original copper bird and flower
Unfortunately, the original copper bird has experienced a couple of major crash landings in the workshop over the past couple of weeks and has sustained some severe structural damage, so he may never see the sunlight again.  However, thanks to my live-in Sales Manager, his fame has spread to the extent that I have orders for another five of these chaps, one delivered already, another one finished and only three to go.  The 'production' models have been coloured with a flame which gives the copper glorious colours of gold, purple, red, blue and silver, although unfortunately the clear laquer that I spray them with to protect them from Mother Nature dulls the colours a bit.
One of the 'production' birds
Playing with the copper for the birds has prompted me to try my hand at some copper jewellery. The foil that I have been using is only 0.1 mm thick, and is too flimsy for jewellery but I have found some 0.5mm thick sheet which seems to be the pooch's plums, although its too thick to be cut with scissors and I had to glue it to a bit of 3mm plywood to make it rigid enough to work with.  So far, we've made a flower pendant which looks pretty good, and today I've been playing around with the flame painting of this thicker stuff. More to come on this front, o yes.

For various reasons, most of them made of copper :-) work on the new engine - The Beast - has taken a back seat recently.  I have finished the crankshaft, lower conrods and the rocker arms and shafts, but I need to get stuck into a bit of alloy casting and I've only this week (thanks to George at the pub) managed to locate a metal paint can to use as the base of the furnace.  I hope to test it over the next month or so, planning to use it to cast engine parts but also possibly some handles and such for future jewellery boxes.

Almost forgot, we took a couple of weeks off and slipped down to southern Spain at the end of June.  We went back to La Herradura, we've been there several times and I was pleased to see that - despite the economic problems in Spain - it doesn't seem to have changed at all since our last visit in probably 2008.  We had an apartment that was right on the beach, within walking distance of a number of restaurants and bars, and in the process discovered what was undoubtedly the best place to eat in town - La Rincon de Pena Parda, for anyone who might be headed that way.
La Herradura
Spanish pensioners working their socks off
 We spent a lot of time loafing around reading (the android tablet was excellent for that, and saved a ton of baggage weight), strolling around, drinking coffee, watching people and generally doing not a lot.  The weather was great as well, and not too hot, which probably also describes the 1.3 litre Ford Ka that we rented, as it was so environmental and economical that every hill was a flurry of gear changes and frantic pumping of the loud pedal to try to make it over the top.  Quite nicely built, but a total dog.

A couple of weeks ago we had a karting practice day at Dunkeswell.  First time I've driven since May, and the first time I've driven at this track since we had the old push-start TKM kart about 12 years ago.  The track has had major changes since then, its now longer and with a lot more corners so very different to our usual track at Clay Pigeon.  

We were promised rain, and lots of it, and the night before there were huge thunderstorms, but on the day not a drop fell although it was stifling hot and very humid.  We had a good day, Jon came up in the afternoon and had a few drives - he hasn't driven a kart for a couple of years, but he was still noticeably quicker than me, but he does weigh at least 10 kilos less so that's my excuse.  I made some adjustments to the exhaust valve and it seems that this has significantly improved the power, so all I need to do now is brake later; b) brake harder, and c) brake later and harder.

Other news this month is that I have treated myself to a new car stereo to replace the standard Honda job which was a bit gutless and had no provision for playing the iPod. Fitting it was relatively easy.  I bought an aftermarket fascia panel off ebay, and proceeded to tear the dash apart, but when I came to stuff it all back together I discovered that the new fascia was a lousy fit in the existing dash.   I ended up having to trim it with a stanley knife and various files before I was happy with the fit, and then had to spray paint it silver to cover up the hatchet marks - of course, the silver was not the same colour as the other dash panels, so they all had to be stripped and resprayed as well. Reassembled the whole shebang, and it looks fine:  more important, it works a treat with the iPod, and the iPhone works via Bluetooth, although my Android phone is running an old version of the software and won't work unless its plugged in (even though it thinks its connected via Bluetooth, it won't play).  Pleased with the end result, the only issue is that the radio only shows the time when its turned on, and the display is not bright enough in daylight so even if it is on, you still can't tell the time. Not to worry, I've arranged to get a new mainspring in my old Omega watch so I can look at that instead :-)

And last, my better half has been plying her sales and marketing skills to good effect.  Not only has she flogged a veritable aviary of copper birds, she has also had me making umpteen chinese bang sticks for her tai chi class.  To be fair, each one is just a piece of broomstick with the ends chamfered off on the disc sander, so they are not hard.

That's it for now.  Next time we should have a report on alloy casting for the Beast, as well as an update of the progress of the copper jewellery and a pair of shoji style wall lights that I am making as well.

Friday 16 May 2014

Update for May

Well, having said that I would update this blog every month, I see that it is now May and this is only the third update since new year.  Whoops.

First up, my personal shout to Stephen Sutton. Unless you live under a rock you will all have seen mention of this guy on the news, he was diagnosed with bowel cancer at 15, and died this week at the tender age of 19. What makes him special is the way that he lived those four short years, and his cheerful positive attitude right up to the end.  His story is here -

https://www.facebook.com/StephensStory

He devoted his time to raising money for a teenage cancer trust, and started with a target of £10,000.  The last time I checked, he had impressed people so much that donations were up to around £3.7 million. I'm not sure if they are still accepting donations, but if they are please honour his memory by sending them a few quid, the collection web site is here - 

 https://www.justgiving.com/stephen-sutton-tct

He was an inspiration to us all and I salute him.  Vaya con su dios, Stephen.

And now: The Beast

This is the new engine, woohoo!  Like the last one, its my own design although based on a real engine, and this one will be made a bit better to ensure that there is no repeat of the crankshaft waggling that we had on the first one.

First:  what makes it different?  The engine will be a 2 stroke, but will not have conventional cylinders - instead, it has a pair of cylinders mounted horizontally, with a pair of opposed pistons in each. One piston operates the exhaust ports, and the other the inlets, and they are linked to the crankshaft by means of a set of rocker arms and double conrods.  To make sure that the red-hot exhaust gas doesn't blow out of the carburettor (now THAT would be worth seeing!) there is a supercharger that blows the fresh mixture into the cylinders and forces the exhaust out through the right holes, and by offsetting the crankshaft slightly this can be used to slightly supercharge the cylinders.  This is the 'real' 3 cylinder engine on which this design is based with the side covers removed to show its innards.  

It was made by the Rootes Group back in the sixties and for its day it was a stonker in terms of performance and fuel efficiency (though some of the trucks that used it had a very short exhaust pipe that exited under the front bumper, and on a long hard pull up a steep hill the bits of red hot carbon flying out of the exhaust would often set the hedges on fire). It was also prone to running backwards if you were careless with the clutch, with the inevitable screaming runaway culminating in a spectacular explosion.  It was a diesel, but mine will run on petrol with real miniature spark plugs so that I can control when and for how long the plugs fire.

So far, I havn't made very much.  I have done a huge amount of designing and drawing, and now know what its going to look like, and have made a start on some of the oily bits.  The first is the crankshaft, since this is the bit that was pretty unsuccessful last time and I need to learn from those mistakes. Most model engine builders make the crank from a solid hunk of steel and machine off probably 90% of the metal to produce a finished part.  They also offset mount the shaft in a 4 jaw chuck on the lathe to turn the crankpins.  Well, I don't have a 4 jaw chuck, and chewing off that much material seems like doing things the hard way, so mine is fabricated from bits like these.

  I cut the six crank webs from 6mm steel plate and drilled them in a stack to make sure they are all the same.  Two of these are welded on to the stub ends of the shaft to make two identical end pieces, and two more welded to another short shaft make the centre bearing section.  The last two are pressed together using the crankpins to make the complete shaft.  Sounds easy, but it was a pig to make (I have the wreckage of the first few attempts littering the bench to prove it). The offset crankpins make the two halves of the shaft asymmetric, and pressing the pins into the webs in the right place was a 'mare involving a special assembly fixture and a lot of careful work with the dial indicator.  Once it was all pressed together, the clamping screws were tightened until they squeaked; all of the various oil holes drilled, and the crankpins permanently locked in place with hammered-in pins.  The finished article was mounted in the lathe, where of course it wobbled all over the place, but I machined the three main bearing journals down so that they all ran true and Robert is your Mother's brother.  Carefully blow the swarf out of the oilways with compressed air, and that bit is done.

I've also made a stack of bronze bearings.  Once again, the traditionalists take a very very expensive chunk of phosphor-bronze and machine almost all of it away to produce a thin sleeve bearing.  Instead, I used readily available bronze Oilite bushes (cost a few pence each) and split them lengthwise with a Dremel cutting disc.  Solder the split edges together, turn the inside diameter first and press on to a mandrel to skim the outside, then de-solder to make a pair of split shells.  Worked a treat, the picture below shows the first pair of big ends in the prototype con rod..

I've also made a set of conrods and rocker arms as prototypes and am in the process of making a full set based on these.  The rods are made from 6mm steel plate, welded up to make a 'fork' shape and then bored at both ends.  The crankshaft end has to have a detachable cap and split bearing so that it can be assembled and taken to bits if needed.  The rockers take most of the force in this engine so they have to be pretty massive - they are made from three steel discs, welded to a pair of 3mm thick steel ribs on a jig, and then bored for bearings.

There's still loads to do, this isn't going to be a quick one by any means.  Next up will be some of the ancilliary bits like the oil pump and supercharger, and then I'm going to try my hand at casting the engine block, cylinder jackets and pistons.  Keep a look-out for smoke to the south west, and keep the animals and children indoors for a while.

Next up, some karting. Took the old girl out for a race last Sunday, and I'm pleased to say I managed a bit better.  Last month I was awful, way behind the rest of the gang, and when you are just banging around on your own its nowhere near as fast as if you are chasing someone.  It also gives you too much time to dwell on how much your ribs and forearms hurt, or how your head is just flopping around from the G force by the end of the day.

This time it was much better.  Equipped with my first new set of tyres since last August, I put in some half decent lap times and stayed with the pack for most of each race, while changing the carburettor jet and playing with tyre pressures seemed to help as well.  Got pulled in by the scrutineers at the end of the last race and he mentioned that the variable exhaust valve was set around 2mm too far out - doesn't sound like much but on these little engines that may have a major impact, so I've set it up according to the instructions and we'll see what difference it makes.  Next outing is a practice day at Dunkeswell in July, no racing in June as I will be in Spain :-)

Just to prove I don't spend all my time hammering metal, I made a coffee table for Sean and Mad.  Its a pretty simple design, although lots of agonising over dimensions to make sure that the proportions came out right.  Its made in english oak, hard work to cut because the grain is very short and the wood is so hard, but when its finished the texture and colour of the wood is fab-u-lous.


It has a drawer that blends in with the sides, and a hidden finger pull and self-closing hinges, but it doesn't have the built in wireless charging mat; the hidden USB ports and the blue LEDs that were originally on the build list, probably just as well.  I'm really pleased with it, probably going to ask to borrow it back for the -tada! - trumpet fanfare....:--. 


Middlezoy arts festival!  The village is running this two day event in July with all sorts going on, full details are on their web site here:-

http://www.middlezoyartsfestival.org.uk/

I am one of the artists exhibiting.  I will have as many bits as I can muster on show - cabinets and boxes, as well as some engravings and maybe some other stuff - and I will be doing live engraving demonstrations.  Lets hope that the weather is fine all weekend, and that de good lawd doesn't take exception to me being in the village chapel and visit us with a couple of thunderbolts, that would pretty much ruin the day.

Part of the festival is a garden art competition, and for this I shall be making a golden eagle, and a family of snails.  More on this next time, or if you come to the festival you can see them for yourself!

Despite being retired and loafing about all day, every day, its time for a holiday so we're off to sunny Spain at the beginning of June.  We're going back to La Herradura again, we know the area well and it should be a fine relaxing time with an apartment right on the beach and in easy stroll of the bars and restaurants.  See you when we get back


Thursday 27 March 2014

Update March 2014

Time flies when you're having fun, or hunched over the lathe for long periods.  This month's update is mostly about The Engine, and I have delayed writing this blog until the engine was or wasn't running, so here we go.

 Last month I had just about finished the cylinders and crank, and about to start on experimenting with casting the alloy parts. Well, after thinking about it for a while I decided to re-design the parts so that I could make them out of sheet and other materials using my little hammer. Casting is OK, but I wanted to get this engine finished and I assumed that casting parts would be a lot of trial and error, so fabricating would be easier. The crankcase was hammered into a U shape from 3mm alloy sheet, with another piece of 3mm bonded to it with epoxy to provide the mounting base for the cylinders.  The end covers were also cut from 3mm alloy with the bearing housings turned from bar and pressed into the end plates. Once hammered into shape, all the parts were machined on the mill to give clean joint faces and to make sure that the whole thing was square and dimensionally accurate.

Here's a couple of pictures with the crankcase roughly assembled, with and without the end plates - the copper pipes are stubs for the inlet manifolds, more on this presently
 
The two halves of the crankcase are dowelled together to ensure they stay in alignment, and the end covers also have dowels for the same reason - this proved to be a good plan, as I lost count of the number of times I had to assemble and dismantle the whole thing while checking that all the bits fitted properly

The next job was to press the two halves of the crankshaft together on the big end pin.  This proved to be a real challenge for several reasons.  First, the difficulty of holding the two halves of the shaft in line with each other while pressing the pin into place:  I ended up with one half in the headstock chuck on the lathe, and the other half in the tailstock chuck, then fiddled and faffed until the big end hole was lined up (done mostly by eye). 

Very fuzzy pic of the innards of the oil pump
Second, pressing the big end pin into place.  I have a little bearing press, and with the simple addition of a length of steel pipe on the handle there is more than enough pressure to belt the pin home.  However, the press fit has to be very tight (don't want that little sucker letting go at speed, do we?) and pressing the pin home raised a tiny steel burr under the shoulder at the end, which made the pin sit slightly wonky - not visible to the naked eye, but once test assembled into the crankcase the wonkiness nearly pulled the crankcase apart.  It took numerous attempts and several pins, before the pin was made to press home square to the shaft and although there is still some slight runout on the shaft its not bad.
Oil pump mounted on end cover and gears in place
Next up, the oil pump.  I made the gears out of brass and the housing from a chunk of alloy bar, bored out and drilled, and with bronze bushes pressed in for the gears to run in.  The idea was to mount the pump to the outside of the end cover and drive it from the end of the crankshaft via a train of gears.  (This is when I discovered that my gear cutting setup sometimes cuts the teeth slightly off-centre, time to invest in a better setup with a more accurate chucking arrangement).  To my considerable surprise, the pump actually worked when I spun it with a power drill in a puddle of oil - I tried with engine oil and it struggled, but the good old 3 in 1 oil was fine.


Final assembly with flywheel and transfer manifold
That's pretty much all of the parts made and fettled so that they fit properly so its time to start putting the thing together for real.

Because the big ends on the conrods are not split, they had to be assembled when the big end pin was pressed into the crank.  This left the crank with pistons hanging out either side, which is why the split crankcase was needed - its the only way to assemble the whole caboodle together.
So, first assemble the oil pump to the end cover; next, press the ball races on to the crank;  put the crank into the crankcase and bolt the two halves together; then insert the pistons into the cylinders (very fiddly business with the two rings on each piston) and bolt the pistons to the crankcase.  Does the whole thing still turn over?  Yes, though a bit stiff as expected. Fit the oil pump drive gears and adjust the backlash, squirt some oil into the sump and the cylinders, and we're ready for a bit of a test run with the ol' Black and Decker.

... and seen from the other side
Woohoo, so far so good, the only problem seems to be the oil pump bearings are not snug enough to stop oil leaking out along the drive shaft, so a bit messy but otherwise OK.

Next up, the transfer manifold.  I experimented with all sorts of options for this - it has to carry the pressurised mixture from the pre-charge cylinder into the firing cylinder, with pressures of around 10 bar, so it has to be pretty sturdy.  I ended up fabricating it from some copper pipe with soft soldered joints - not very efficient, but for this prototype it will do.  Last item is the flywheel, made from a chunk of steel pipe with a plate welded across, it ain't pretty but it works. Last addition, a piece of copper plumbing pipe to act as a silencer and catch the exhaust gunk.
Finished and ready to run

Glow plug in and carburettor mounted on a short piece of flubber hose - quicker than making a proper manifold. I have made my own carburettor, but a) its huge, and b) I have no idea if it will work so if the engine fails to start I won't know if its the carb or the engine.

Right.  Clamp the whole thing to a bit of wood in the vice, attach the fuel tank and various bits of pipe, and give it some with the power drill. Several hours later, it eventually started and ran for a few seconds.  I know it was actually firing, because the cylinder head and exhaust got hot, but it turns out that starting easily is not a feature of this engine. After many hours of fiddling I eventually got it running for a few minutes  (the video goes on a bit, and its all much the same...)


It may not be obvious in the video, but by this time the two ends of the crankshaft had become slightly deranged, resulting in massive vibration (enough to shake all the tools off the bench) which rapidly began to shake the fabricated crankcase apart.  Not keen on seeing how long it takes before hot bits of oily metal start flying through the air, so it probably won't be running again.  I've learned a huge amount during the build, and seeing it actually running has prompted me to set to work designing another one - this will have two cylinders and better port timing, plus a bigger flywheel, as I think these are the main reasons why the engine was so hard to start.  For a taster of what the new engine will be like, google for 'Commer TS3', and if you tell me I'm mad I'll slap you with a kipper.

That's all for this month, I need a rest and time to clean up the workshop :-)

Tuesday 11 February 2014

First post of 2014 woohoo!

Well here we are again, another new year and another round of posts, hopefully monthly as usual.  A bit late in starting as Mr Google decided to change the blogger interface so you now need to get a spade out to dig for the information that lets you post a new entry - why? National security?

Anyhoo, some good stuff going on already this year, so lets get started.  First up, a couple of WTF?? things.  

The 2013 Harley Davidson Super Glide Custom A 1,585cc Harley-Davidson Dyna Super Glide, donated to Pope Francis last year and signed by him on its tank, is displayed ahead of Bonham's sale of vintage and classic cars, at the Grand Palais in Paris, Wednesday, Feb. 5, 2014.First is the announcement a couple of weeks ago that the Pope was going to auction off a Harley Davidson motor bike for charity.  He was given the bike to celebrate the H-D centenary and he graciously signed the fuel tank before letting it go for sale.  Raised a load of dosh for good causes and therefore a Good Thing.  My question is: what in the name of Mother Teresa were H-D thinking when they gave him the bike - its not an obvious marketing thing (not many Hell's Angels look up to the Pope after all), and the image of his Popeness tearing along the autostrada clutching his skull cap and with his white silk robes blowing up over his head is one that I'd prefer to forget.

The second news item is a Well Done!!! to the bloke who arrested Tony Blair in a posh restaurant a couple of weeks ago.  Apparently the bloke in question was a barman at the eatery and when he spied Our Tony shovelling expensive nosh into his face he trundled over and attempted a citizen's arrest (which he is quite entitled to do) for the crime of getting the UK into what some perceive as illegal war in Iraq.  To be fair, Tony did a good job of dodging and weaving and managed to avoid being dragged off to the local nick, but I imagine that his bodyguards were a bit flummoxed - they are supposed to protect him, but if the perp is a righteous citizen carrying out a legal arrest they're a bit banjaxed.  Anyway, 10 out of 10 to the barman whose name is Twiggy Garcia and who quit his job immediately after.  Not all bad for ol' Twiggy though, as there is a running bounty payable to any potential arrestors and Twiggy picked up two grand from them for his efforts.  A good result all round, except that Tony is still walking the streets instead of sharing a damp cell with a man named Bubba.  Check out the story here

On to other things, and the first of these is the engine.  I've managed to get quite a bit done on this over the past month or so.  I was originally going to make a twin cylinder engine, but part way through making the first parts I realised that because I had no idea if the thing would start and run, making a double lot of parts for what might end up as an inert lump of metal was a bit of a waste of time.  Instead, the design has changed to be a single cylinder jobbie, but keeping the pre-charge cylinder arrangement.

So far, I've made the following:

- Cylinders, liners and heads for both the pre-charge and firing cylinders
- The crankshaft and con-rods, with bronze bushes for the big and little ends
- A pair of pistons, complete with two cast iron rings each and pressed-in wrist pins
- The gear set to drive the oil pump off the blunt end of the crankshaft, pump gears are under construction now


Firing cylinder, head and piston
The cylinders are cast iron, with an aluminium jacket machined from bar and pressed on to the cylinders, and the inlet and exhaust ports machined through both metals.  Making the jacket from alloy was pretty tedious, as it takes ages to bore out and wastes a ton of material.  Not only that, but machining flats on the outside to attach the manifolds is not the strongest way to do this, so for the next version I will cast the jacket with manifold ports cast in.  The heads are just machined from bar.

The crank is made in several parts - two steel end pieces machined from bar and each pressed hard into a circular web plate, and the big end journal pressed in good and hard to both webs once the conrods have been fitted.  Not finished this bit yet, as I need to make a jig for the pressing together part to ensure that the two halves of the shaft are dead in line or the engine will run like a 1956 BSA.


Crank halves; conrod blanks, piston and cylinders
The pistons were a challenge, because they need a slot machined inside for the conrod to flop about, plus a very central hole for the gudgeon pin.  As if that isn't enough, the piston rings are minute - cross section is 1 mm x 1mm - and very fragile, so we have a small pile of broken ones.  Lucky I made a few spares :-).  I made the rings by machining a cast iron cylinder, lapping the outside and then parting the rings off .  Careful polishing of the faces so that the ring fits the groove properly, then split each one with a cutting disc in the Dremel and trim the ends of the split carefully to give the required 0.004" gap when the ring is placed loose in the bore.  To cap it all, the rings need to be stopped from rotating, as if the ends coincide with one of the ports the ring will snap and cause some serious grief.  The only way to stop them turning is to drill the piston with a 1mm diameter hole, press in a pin and grind it down to leave around 0.3 of a mm sticking out into the groove.  Then file a recess in the back edge of the ring around 0.5mm deep and hope it doesn't bind when it finally gets assembled.  Fat fingers are NOT an asset here.


Oil pump drive train plus one of the brass pump gears and its bearings
Although this will be a 2 stroke, I'm keen for it not to run in the traditional cloud of blue smoke - this is part of the rationale behind the pre-charge cylinder, because this will not need oil mixed with the fuel for lubrication.  However, there needs to be some way of oiling the crank, pistons and other whirly bits, so she's going to have a proper gear oil pump with a wet sump.  The drive for this will come off the blunt end of the crankshaft, through a train of gears that reduce the speed of the pump (since apparently slower pumps of this type work better than faster ones).  I made a whole bunch of gears for the Magic Clock a few months back, so making these was pretty straightforward although a 60 tooth gear takes around an hour to machine, one tooth at a time.

Trial assembled whirly bits
Once the gears are finished the only easy bits left to make are the flywheel and the manifolds.  I'm not sure how big and/or heavy to make the flywheel yet, and it will need some means of starting to be built in as well - I'm planning to use a cordless drill to spin it over, not sure how yet.

The last adventure will be the casting of the crankcase.  This will need to be split in two halves to allow the oily bits to be assembled, and it will have a pair of end plates which will carry the ball bearings for the crank as well as the oil pump and gear drive.  I  plan to melt the alloy in a tin can, heated to red heat in a ceramic flower pot full of charcoal and retained in a metal paint can with a hair drier blasting air up through the charcoal to give it mucho hotness.  I have all the parts except the metal paint can, so I'm checking all the builder's skips that I come across in the hopes of recycling one.  I've already made the patterns for each part out of styrofoam, and I plan to coat each one in a plaster mix before packing them in sand and pouring cellulose thinners in to melt the foam and leave the cavity in the sand behind.  It may not work, but at least I can keep re-cycling the mistakes until I get it right.

Almost last, the airbrush has seen some more active service with some decoration on the side pods of the kart.  Plain black is not a good racing look, so I played around with a variety of different ideas but soon realised that the water-based acrylic pains that I have are just not intense enough in colour.  I need to play with the proper solvent-based ones, but as these run at around a tenner per pot I'm reluctant to shell out for these.  Instead, I opted to paint something which doesn't need a strong colour, and the answer is FLAMES!.  I doubt that they will survive the first race, but I had a lot of fun painting them

And finally:  the Tourette's Parrot.  We were at the pub a couple of weeks ago and the landlord Graham had a fine green parrot climbing all over him.  I admired the bird, as you do, and asked how he came by it and he said that he rescued it.  It turns out that the bird can talk really well, but hates children - so much so that it launches into the foulest language imaginable every time it sees one, and since the previous owners were expecting their second child they were understandably keen to offload the foul-mouthed critter.  Most Excellent, havn't laughed so much in ages.

Next month we should have a full report on the alloy casting adventure, plus I need to fit a new towbar on the Boss's new car before the first race in mid March. Oh, and the Magic Clock has lost one of its LEDs, so I need to fix that