About Me

I've been taking things to bits, and making things ever since I can remember, starting with dismantling knackered alarm clocks and watches and helping my dad fix the car. Now I have a well-equipped workshop and have aquired lots of new skills, so I can make better stuff. When they first appeared, I became involved with personal computers, and these and developments in electronics have increased the scope of the things that I can do. Just recently retired, so O yes, now I can make all sorts of stuff.....

Thursday 31 December 2015

Last posting from 2015

Right.  This is the last post from this year, together with a resolution to post more frequently next year.


The big event of the year was the Somerset Arts Weeks malarkey.  Yours truly and an artist (Simon) from the village set up shop in the church and waited for the punters to arrive, which they duly did - not in huge numbers, but we saw around 150 over the two weeks, not bad considering we were only there 4 days of each week.  Various items of interest to note:-

- Churches, especially old ones, are cold with a capital F. Sitting around waiting for the crowds was not much fun, even with several layers of fluff to keep me warm.  Unfortunately, Simon had hung all of his pictures off the radiant heaters in the church using nylon fishing line (heat and nylon don't work well together) so we only managed to reorganise things to get them working at the end of the last week.

- We managed to blag a climb up the tower on to the roof, some spectacular views from there if you like heights and very narrow and dark spiral staircases.  On the way up, we had a look at the church clock, which dates back to the 1700s and which can still be persuaded to work - the main reason it doesn't run is because it has to be wound up every day, and nobody wants to climb the stairs every day.  An ideal opportunity to install a Grizzly automatic winder.....

- Most of the people who turned up were other artists who are not interested in buying stuff, only seeing what everyone else is doing.  This is not a Bad Thing, met some really interesting people but unfortunately none of the interesting ones spent any money.

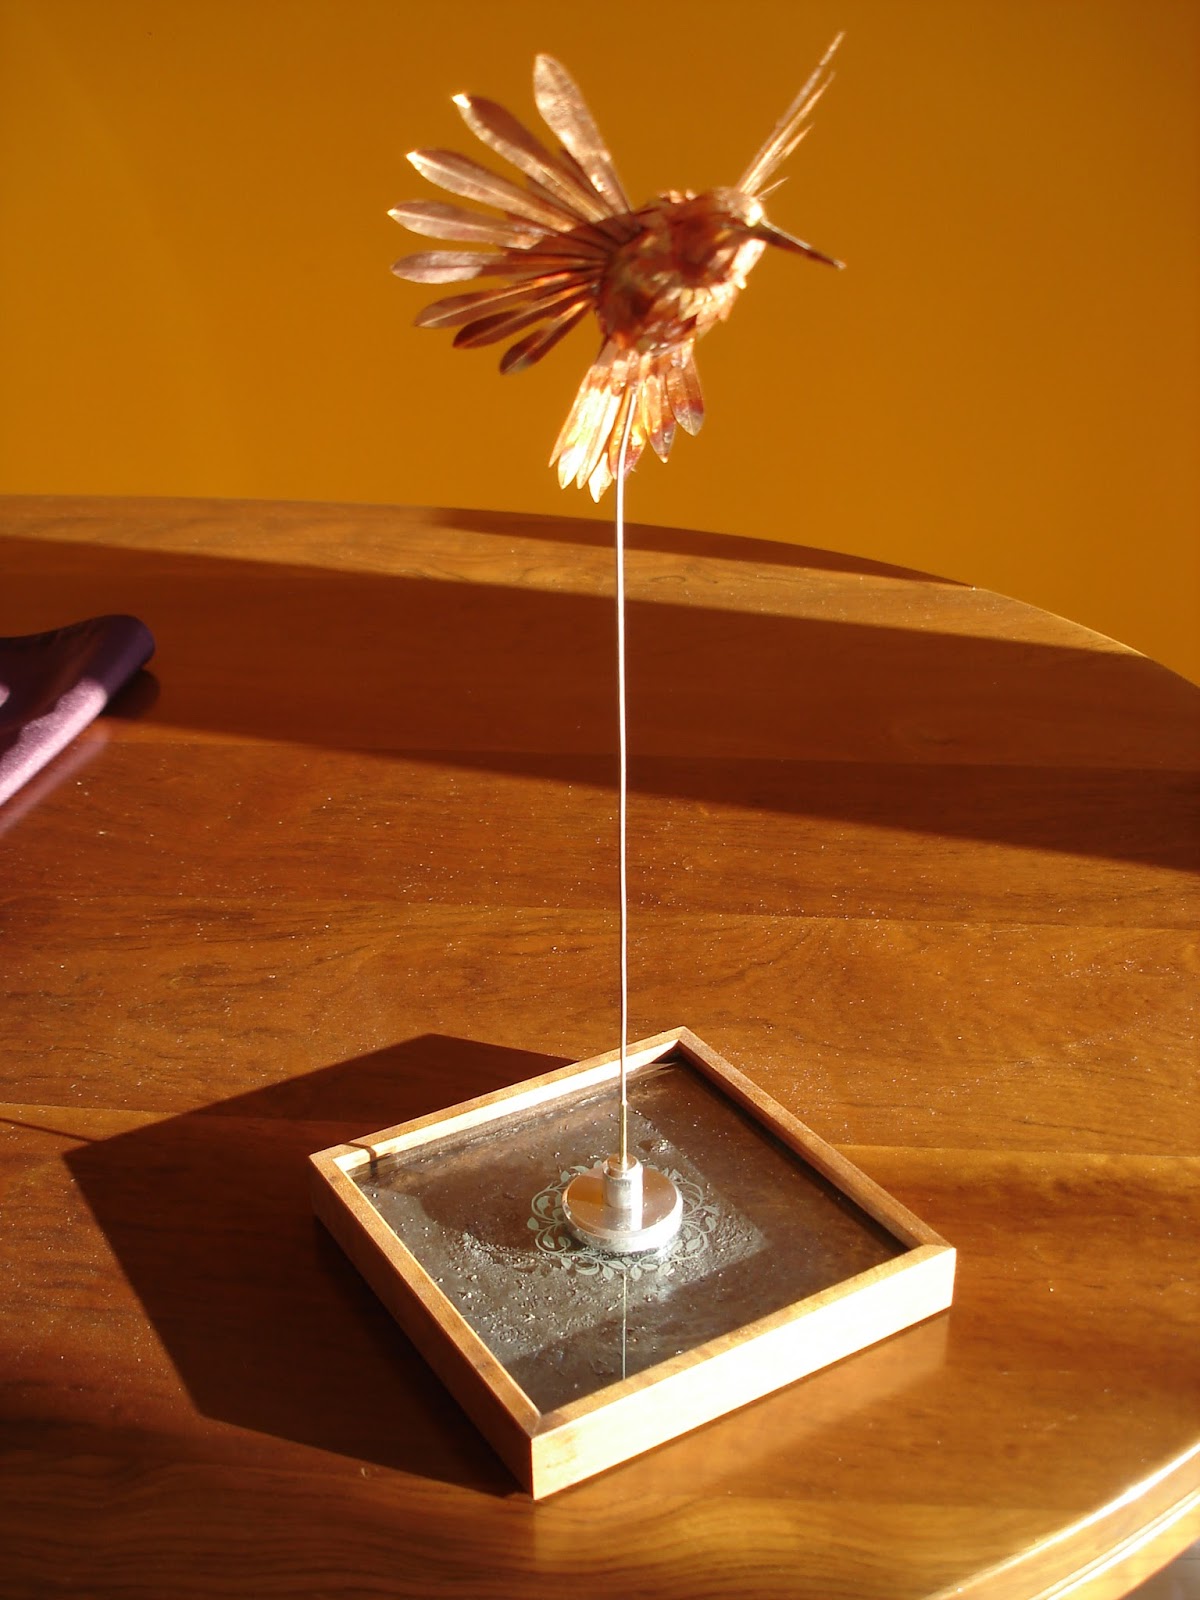
- Met some nutters as well.  The arts festival covers around 200 different locations, all spread across the county, and a printed brochure means that you can choose the particular artistic medium that interests you.  One elderly gent proudly told me that he had already beaten his previous record and was well on the way to seeing the best part of 100 different sites.  He showed no interest in any of the stuff on display, just wanted to tell me how many places he'd been.  Another lady appeared, walked briskly around the church, and whisked out again, all in the space of 30 seconds, so she was really interested in our stuff.  Not.  And finally, my favourite, a very truculent old trout who was determined to have a full-on loudhailer argument with me about whether my copper 'Bird on a Wire' sculpture was a kingfisher, when I said it was a hummingbird.  It matters not that I designed it and made it, it would seem : "I know a kingfisher when I see one, young man" she hooted.  Best part? She wanted to buy it, but I had sold it only about half an hour beforehand.  Hur, hur.

Blue Bamboo box with copper foil feature on front
 A last minute addition to the exhibits was another jewellery box.  All of my previous boxes have been solid wood, but I have wanted to do a painted one for some time and this is the result.  Its called 'Blue Bamboo', painted in a deep blue metallic colour, with bamboo leaves airbrushed on the lid in several different overlaid colours. The box has three lift-out trays and is lined inside with a deep pink silky material. It didn't sell at the show, and I've since replaced the copper foil bamboo leaf motif  on the front which (was prone to getting knocked about) with a more robust etched copper plate arrangement. I'm really pleased with the end result, so much so that I plan to do more stuff in paint in the future.

Bamboo feature replaced with etched plate
Inside the Blue Bamboo
 All in all, the show was OK, sold some stuff and got back around double what it cost.  However, it seems to have taken over the entire year, and  doubt that I shall do it again. My feet are only now starting to thaw out as it is.

With all this excitement, progress on the engine has been a bit patchy this year, but I have finished the supercharger, which was one of the parts I was concerned about.  I'm not sure how much blowing it will actually do, but when I spin it at around 2000 rpm with the electric drill you can feel a fairly brisk breeze blowing out of the ports so that's a good sign.  It will be geared up to run at 3 times engine speed, so it should be spinning at maybe 10 000rpm when the engine is running.
Dummy assembly of the engine so far

The body is bored from a solid chunk of alloy, and the rotor is also alloy with slots cut with a milling saw and carrying four Tufnol sliding blades. I had to construct a board to fit on the milling table so that I had enough room to cut the slots, a bit tedious as I had to take hundreds of very fine cuts because the whole setup wasn't very rigid - not helped by the chinese cutter going dull after the first slot had been cut.  Grump, grump.

The blades are supposed to be flung outwards under centripetal force to contact the bore, but I don't think it will manage that reliably, so I fitted some slim leaf springs  underneath each blade and that seems to work.  More recycling, the springs are cut from the old broken mainspring from my Omega watch.


The last parts to be made are the pistons and rings, and the last set of small connecting rods.  Once New Year is over, I plan to order the materials for these and make a determined push to finish the beast.  Stand by with the ear defenders.


I also recently finished what has to be one of the best projects ever when it comes to that elusive WAF (wife acceptance factor).  Its a shoe cabinet, made to match the existing chest of drawers in the main bedroom, so its made in MDF and veneered in a wood called Wenge which I've never used before. The front of the top drawer is airbrushed to match the cherry blossom on the wall in that room, and the drawer is lined with rectangular patches of brocade, all offcuts from the ring boxes that I have made.

Shoe rack with tip-out bins
The shoes are held in tip-up bins, three rows per bin, and the cabinet will hold around 30 pairs of shoes when full.  None of the shoes will be mine, as I only have one pair and I'm wearing them.


Drawer lined with offcuts
The veneering was a nightmare - the grain of the wood is very coarse, and runs in all directions at once, so trimming it is tricky to say the least.  It also splits every time the wind changes, and because its so coarse it is really difficult to get a smooth finish. Shan't be using that again, even though it has a very nice warm dark chocolate colour when finished.  To add to the fun, I used iron-on adhesive the same as the stuff I successfully used on the grandfather clock re-build of a few years ago.  Unfortunately the latest batch of adhesive is half the thickness of the stuff I used before, and has about ten percent of the stickiness, so this made a tricky job about twenty times more difficult.  Shan't be using that again either, and shan't be buying from that supplier again either.  I find myself getting more and more cross about not being able to buy stuff that is properly fit for purpose - whether its screws, glue, paper, or whatever, the only emphasis seems to be making it as cheaply as possible rather than making it to do its job properly. I'd rather pay double and get something that works. oops, sorry, rant over.

Despite the problems, its turned out fine and the proud owner loves it.  Hooray, brownie points all round.

And the last news is that we are booked to go visit Sean and the gang in Oz in late February.  We are stopping off for 4 days in Singapore on the way out, and again for a day on the way back, just to break up the tedium of the flights. Lots to do before we go, but we are both really looking forward to seeing them all again.  Whoop, whoop!

I will try to get the engine finished before we go, can't take it with us but a vid of it running would be good to bore people with, no?


Wednesday 2 September 2015

August madness part 2

Ah.  Failure to engage brain before pressing button means that by now you will all have around 95 copies of Part 1.  oops.

Right, part 2.  More stuff for the arts week involves me trying to come up with some completely new ideas.  

I originally planned to etch a deep and meaningful text on to a sheet of glass, using a hand-cut stencil made from the thin plastic adhesive film that I use for airbrushing.  However, my early experiments proved that a) cutting a complex stencil in situ was a nightmare, causing my index finger to be numb for several days due to the pressure on top of the scalpel, and b) the etching fluid creeps under the adhesive, giving a slightly fuzzy edge.  I had planned for around 10 lines of text, and realised that it was probably going to end up being a lot of hard work with a poor result.

As you all know, I have played with the airbrush a number of times with varying degrees of success - its is both the most intriguing and the most difficult device I have ever played with.

So instead of etching the glass, I used the same process but used Tibetan writing rather than English (it looks so much better) and airbrushed it instead with a base colour of blue and a subtle shading of black.  The Tibetan is a famous buddhist mantra which translates as 'om mani padme hom'.

I was going to frame it, but this presents problems getting light to shine through,so it ended up free standing in a wooden base. The picture doesn't do it justice, it looks great and has already been claimed by 'er indoors.

This inspired me to do some similar airbrushing, but on card instead of glass.  By now I had discovered that if I wrapped the handle of the scalpel with gaffer tape I didn't end up with Artist's Numb Finger Syndrome, and cutting the stencil on card requires a lot less pressure than on glass.  A new blade in the scalpel didn't hurt either, although I had only had the old one for around 20 years and it should have lasted better.

I wanted to write a word in several 'pictorial' languages, and decided on the word 'compassion' simply because I came across it while rummaging through the buddhist stuff for the glass plate above.  I ended up with three of these in tibetan, japanese, and arabic.

The first two were easy to find the word for 'compassion', but I struggled to find the word in arabic - found sympathy and pity, but not compassion - so I ended up using a script which means 'compassionate', usually in relation to Allah, I believe. I also thought that I would try to portray the contradiction between the idea of religious compassion and Islamic fundamentalism by having the shadowy sinister figure in the background.

While I like the first two, I'm less happy with the last one.  The script has ended up a bit clumsy, and the shadowy figure is not as shadowy as I wanted so this one may finish up in the bin.

On a bit of a roll here, both the workshop and me splattered with paint but all fired up.  Took a day off and went to Wells, and in a shop discovered a water colour sketch that took my eye - this is it on the right.


I've never been much of a painter, but I can sketch a bit, so I thought I would have a go.  This picture is of buildings in Havana, so I started digging through my holiday pictures to see if I had anything similar.  I finished up with a wad of pictures, mostly of places in Spain, but nothing that took my eye, so I decided to get that nice Mr Google to take a look at Havana.

A couple of things emerged from this search.  First, Havana has tons of ornate old buildings from the days when the country was relatively rich on earnings from sugar cane, but while a few of these grand buildings are well preserved and looked after, most are a mess of broken windows and no paint.  A great shame, but given that they have been shut off from the world since the early sixties, hardly surprising. 

The second thing is the cars.  Car imports completely stopped in around 1962, and most of the cars that were on the roads then are still running today. With the recent re-establishment of diplomatic relations with the US (I guess the White House must have finally run out of cigars) the classic car boys in America are rubbing their hands in anticipation of getting their hands on a few pristine 1950s Chevrolets, Cadillacs, Fords and all the rest, and picking them up for next to no money.  I thought I would paint a couple of these old cars against the contrasting backdrop of the old dilapidated buildings.

It was while looking for suitable pictures that I realised that, although a few of these grand old cars are in almost perfect condition, most have survived the past 50 odd years being run into each other and the surrounding scenery; breaking down and being fixed with whatever parts could be scratched together, and going steadily more rusty and worn out.  Cuba is a small island, so high mileage is not a problem, but large numbers of bodies climbing in and out over the years have pretty much shredded the interiors as well.

As a result, the Cuban classic car is pretty much a bodged together piece of junk, only kept running by the ingenuity of the people and the fact that if the car breaks there is never going to be a replacement.  The pictures that I painted are therefore an attempt to try to portray these cars as they really are, rather than how we would all like them to be.

The fourth picture is of one of the few buildings that have been preserved better than most, in a street called the Paseo de Marti.  I spent too much time on the detail of this one, and it has ended up looking like a blueprint instead of a picture.  Oh, and yes, the buildings really are painted that colour.  I'm not much of an artist, but they havn't turned out too badly.


Other things this month include my new phone.  "Ooooooh," I hear you say " He's gotta new phone, one a they OiPhones or some such".  Don't know me very well, do you ? :-)

I'm sad to say that my old phone, which I inherited from Owen, finally gave up the battery ghost at least partly because the USB plug 'ole had gone wonky and wouldn't make proper contact with the charging cable.  A phone that won't charge is as much use as a useless thing, so it was time for a replacement.  Remember, dear readers, that the last phone that I actually bought was probably in around 1995 and all of my phones since then have been donated by Sean (thanks mate!).

I scanned the mighty ebay for a while looking for a slightly used brand name phone but soon realised that anything half decent went for a big wedge - in my retirement I don't use the phone much, so no point in spending loads on it.  Instead I started looking at new non-branded phones, and finished up with a Chinese Cubot S200 - full 1080p 5 inch screen; 13MP camera and various other goodies for around 70 quid.  Bit nervous in case it turned out to be a dog, but it is excellent with a capital X - the screen is great, its fast and so far glitch-free, and the only downside is that its BIIIIIG. 

And last, the 'Harmony' jewellery box that I made some time ago has finally been sold, hooray!  This means that I will not be able to show it at the Arts week, so boooo.  However, I had previously partly finished a new box which was destined to be spray painted, so I've dug that out and am planning to finish it over the next couple of weeks, hooray!  The only problem is what colour to paint it, and what kind of 'theme' to give it - suggestions on a postcard please.

Next update will be after the arts week when things should be returning to normal and I can hopefully re-start work on the engine and other stuff that's been put on hold for most of this year.  As always, I can't wait.


August madness

Well, its already September and here we are again.  Lots been occurring over the past couple of months, mostly to do with getting stuff ready for the Arts Week in October.

As you might expect, I have been trying to make a load of new stuff - I don't want to spend every day making some variation of the same box or whatever over and over again, so I have decided to just make things that I think will look good and see if somebody might buy a few.  If not, we're going to have a very full house in a few years.

For the Arts week, I have made a few new things from copper foil.  This foil is cut to shape with scissors; coloured over a small flame, and then fixed to some kind of a framework. The first of the new pieces is a good example - he's a chinese dragon, around two feet long, made with a coiled copper wire framework and individual copper scales fitted over the top.  The scales overlap each other from front to back, so I had to start from the tail and work forwards to the head.  Because the body is tapered, and curls in different directions, the scales need to vary in size as well as being fitted close together or further apart depending on the curves.

All this means that the beast has taken around three months to finish, and to be honest it hasn't turned out quite as well as I had hoped after all that work.  Ah well.

The next two were much quicker to make, and turned out much better as a result.  The first is a pot plant, consisting of a dead tree branch concreted into a pot, with a twisted copper wire 'vine' curled around it with leaves soldered on at random intervals.  It also has a pair of flowers, made from copper but airbrushed over the copper colouring to give a a more flowery effect.  I quite like this one.

The last one is a small bird on a wire, and was originally intended to be fitted into the pot plant so that the bird hovered over one of the flowers.  Good idea, but the mechanics of a surprisingly heavy bird balanced on top of a long wire, combined with the limited space available in the pot, meant that it was never gonna fly (hur hur hur, geddit??).  Instead, I made a mould out of MDF and melted some lead into it to form a square slab - the oxide film on the surface turned a very pale blue, so I sprayed it with laquer to try to capture the colour.  The lead was fitted into a wooden bas, and topped with a glass plate.

I planned to drill the glass to let the wire go through, but discovered that although drilling in a small bowl of water worked very well, as soon as the drill broke through the back surface it snatched at the glass and cracked it.  Only had one piece of glass, so I made a polished brass and copper ferrule for the wire to mount in and etched a small pattern on the glass to cover up the cracks.  It looks pretty good.


Friday 10 July 2015

Busy, busy, busy....


Its continued to be pretty hectic round these parts, hence the long delay in posting an update.  Still, here we are, so lets get started. The big news of 2015 is that I'm going to be exhibiting at the Somerset Arts Weeks in October, a joint effort with a painter from the village. We're going to be showing our stuff in the church, better watch out for the odd lightning strike.

This means that I'm going to have to crack on with making some real art, gor blimey, so I decided to make a start early rather than waiting until the last minute and running out of time.  The first item is the Giant Dragon, made of flame coloured copper foil mounted on a soldered copper wire frame - I have been meaning to make him for some time, and had planned to put him in the garden, but I don't think he will cope well with assorted pigeons landing and/or pooping on his head, so he will be mounted on a wooden base for indoor action only.

I made a start a few weeks ago and have made the frame and around a quarter of the body covering before coming down with a dose of flu - at least that's what I thought, then realised after a few weeks that it seemed to be getting worse.  Much research later and I concluded that the fumes from the superglue that I'm using was probably the cause, so I stopped dragon making for a couple of weeks and all is better again, so that's probably it.  Mind you, I also discovered a can of cellulose thinners in the garage was leaking slightly, and I don't suppose the fumes from that did me any good either.  I'll restart in the next week or so, either with the garage door open and/or wearing my trusty breathing mask, and see if that solves the problem. Move over, Darth.

Once the dragon is completed, I plan to make a life-size rooster using the same method, plus a few other copper-related bits as well.  Other non-copper things are also planned - I need to have enough varied stuff available for sale during the show to try to get back my entry fee, so we're experimenting with some new stuff, watch this space for more details (and watch the rubbish bin for some of the results of the experiments...)

One of the arty experiments has been some small boxes with fabric inserts in the lids.  These were originally intended as ring boxes, but several people have suggested that just an empty box would be just as good.  I've made a bunch of them, some for real customers, but mostly for stock for the Arts Week show. 

 I have wanted to make some small boxes for a long time, but the availability of decent hinges has put me off - even if you can find some quality butt hinges, they are a nightmare to fit in such a way that the lid sits properly on the box. I had the same problem with my jewellery boxes when I first started and I ended up with the same solution - make my own hinges.

On these little boxes I have made the hinges from solid square brass bar, drilled to take a soldered-in hinge pin and with threaded holes for the screws to fix it to the box.  The brass bar is drilled on the milling machine, so I can get the holes in the correct alignment, and I've made a simple jig to make sure that the screw holes are in exactly the right place in the box.

I'm amazed how easy this has been.  The screws are fitted from the inside of the box, heads hidden under the lining, and every box so far has gone together pretty much perfectly first time.  A bit of a result, if do say so myself.

I've also made a couple of boxes with brass and copper features on the lids, embedded into the fabric. The brass/copper has the design drawn on using a fine point permanent marker, and then etched using standard ferric chloride circuit board etching chemicals.  It takes a couple of hours to get a decent depth of etching, but it has turned out really well.  Don't have any pictures of the boxes at the moment, but this is a brass tab for a handbag strap that was made using the same method


Grinding a bit of scrap pipe to test
The engine has had to take a back seat for a while, but I have made a significant step forward.  I made the cylinders from some cast iron that I picked up at a scrapyard, but its pretty poor quality with tiny hard nodules throughout, which means that getting a good surface finish from a normal boring tool is impossible.  The only bit that matters is the bore of the cylinders, and I couldn't bore it anywhere near smooth enough.  The only answer was to grind it, but first I had to make a grinder.

The long nose arrangement
 As usual, it is made from reclaimed parts, including an old 540 motor from a broken power drill, and some ball bearings and a hollow shaft from an ancient photocopier.  It is designed to be mounted in the toolpost of the lathe so that the grinding wheel runs opposite to the rotation of the work, thus giving the best finish. Because the cylinders are around 90mm long, the nose of the grinder needed to be at least 100mm, hence the long hollow shaft arrangement.

The spindle is driven via a toothed belt from the motor - gears would introduce vibrations that I wanted to avoid.  However, although belts are cheap and easy to find, the pulleys cost a relative arm and a leg, and they are hard to keep concentricity while machining them to fit.  So I made a pair of pulleys from some aluminium bar that I had in the scrap box.

This is the home made belt drive gubbins
The tooth shape is fairly simple, and I was planning to make a cutter to cut each tooth to the correct form.  However, I found a man on YouTube who had made pulleys by drilling holes in a circle and then machining away the excess metal to leave half a hole - which is pretty much the correct shape for the teeth.  I tried this and it worked a treat, needed a bit of careful fettling to make the belt sit snugly, but the end result drives the spindle just fine.  The belt was salvaged from an old strimmer and split with a knife blade to reduce its width.

Hard to see, but this is before grinding...
... and this is after, a massive improvement

Well, does it work?  Not 'arf, missus.  Need to take very small cuts, and run the grinding wheel back and forth several times at the final dimension to allow for any spring in the long spindle, but it has produced a very smooth ground finish that I should be able to hone even finer with some lapping paste and a a bit of wood.  I'm rather pleased with it, and pretty sure that it will get a lot more use in the future.

After such a success, I turned my attention to the kitchen music player.  Some of you may remember that I set up a Raspberry Pi to run as a music server, dragging music files off the main server and squirting the noise at a small stereo in the kitchen. It used software called MPD on the Pi, and you can control it from any phone or tablet, using a variety of apps.  It has worked well for a couple of years, although refusing to play some of the tracks for no reason I could see.

Recently however its been getting more and more short tempered and reluctant to work, and eventually laid down and died - it would work for a short while if restarted, but it was increasingly iffy.  I went in search of an alternative, and came across something called 'mopidy' which apparently does much the same as MPD but with a better user interface and some other tweaks.  So, opened up the Pi, loaded the software on the SD card, and restarted it. Underwhelmed. Very.

For starters, the PI wouldn't display anything on the screen: turns out that this is pretty common, and you have to tickle about a hundred parameters before stuff eventually appears.  Then it seems that mopidy needs to be configured by editing a config file - nothing odd in that, except that the file in question doesn't appear to be read at all by the software, so you can change all the settings you want and mopidy ignores all of the changes because its looking at a different file, or not looking at all, I can't tell which.  Starting to rant at this point, so time to look elsewhere.

Found another app called Musicbox, based on mopidy but with a user friendly front end and control and configuration done by means of a web page on the Pi.  Looks good, I thought.

Should have known better.  The same issues with getting anything on the screen to start with, then the same configuration issues as with mopidy - ie, software not reading the config file.  The final straw was the web interface - the software doesn't seem to put the web page file in the right place for the remote browser to find it, hence the browser can't connect.

So, I can't configure the software, and I can't access it using the only interface it is supposed to have.  As a result, I can't tell it where to look for my music, and can't make the client on my tablet see the Musicbox.  Some of you will have experienced my well-known linux rants before, and this is a classic example of what makes me foam at the mouth - I've spent the best part of a week trying to make a simple piece of hardware and software work the way the documentation says it should, and failed, and although there's loads of 'this is how you fix it' stuff on  the web, even when you've waded through the ranks of spotty dorks trying to show you how clever they are, the fix it solutions sometimes work, more often don't, and all require a degree in ancient Sumarian to understand.  So the Pi and linux goes back into the cupboard until I convince myself that its worth having another go at it.

As a result, the kitchen music player is likely to end up being a simple dock for an iPod, life is too short to be wrestling with the Pi - although it is a bit ironic that the Pi was intended to help kids learn how to program computers, and I would say it ain't doing a very good job of that.

Other stuff over the past few months have included a new amplifier for my music in the workshop - the old one was a Technics unit, bought in around 1980 and it finally gave up the ghost.  The new one is made from some cheap amplifier modules that I already had in the junk box, plus a transformer from the same source, and it sounds great.  It still needs a case to prevent the unwary from certain death by electricity, but it works fine and cost exactly nothing. Result.

I also had an old pair of Technics speakers in the workshop, and discovered during the surgery on the amplifier that the main driver in one of the speakers had keeled over.  Similar age to the old Technics amp, but luckily I also had a spare set of speakers tucked away and we now have a full sound stage again in the workshop.  Lucky we have very few neighbours :-)

More next time, progress on the art stuff and more engine work I hope.  I've said it before, but I am planning to try to publish these ramblings at more frequent intervals in future, but I wouldn't hold your breath if I were you


Thursday 26 March 2015

Update - March 2015

Well its all been happening here, so much so that I havn't managed to post anything since October.  Bad dog.

There are some extenuating circumstances, the main one being that Sean and The Gang stayed with us for around 6 weeks during December and January prior to them setting off for Oz.  It was great fun having them here, though a bit sad for everyone when they left - however, with the techo-wizardry available to us these days we can message and talk any time we want.  A bit different to when we went to South Africa in 1970 and letters took around 6 weeks to arrive and phone calls were so rare that you had to book each one in advance with the exchange.

Anyway, things are gradually returning to normal and the hammer has been in action again in the workshop, starting with the great aluminium melting experiment.

I wanted to see how easy it might be to melt aluminium in order to cast pieces for the new engine.  After lots of searching around I managed to locate a couple of metal paint tins, punched a few holes in them and welded them one on top of the other.  The idea was that the top one holds a bed of charcoal, and the bottom one feeds a blast of air from a hair drier through the hot charcoal to make it hot enough.  I welded a long handle on to an empty bean tin and filled it with all the offcuts of aluminium that I could cram in.  Right, lets get started.

First, set a small fire in the top can and get the charcoal going.  While that was cooking I gaffer taped the spout of the hair drier to a length of plastic pipe and taped that to a hole in the side of the lower paint tin.  So far so good, charcoal cooking nicely by now, so insert the bean tin into the fire and pack some more charcoal around it.  Time to apply some wind, so on with the hair drier.

Those who have seen the NASA space shuttle taking off will have a rough idea of the result, an absolute tower of blue-white flame at least three metres high accompanied by a roar that would scare a polar bear.  I managed to keep most of my clothes and body hair intact while realising that the blast was eating the charcoal at an incredible rate, at the same time generating enough heat to set fire to the moon.  I couldn't get near enough to add more coal, so I switched off the blower and re-fuelled, at the same time noticing that the heat had started to melt the plastic pipe.  Hmm.

The furnace afterwards
Less blow required, so I disconnected the blower and pipe from the tin and started to blow from a distance - much less spectacular, a lot less noise and fury, and within a few minutes the metal in the bean tin was melting rapidly.  I had previously made some rough patterns out of styrofoam and bedded them into sand in a couple of flower pots, so when the metal was nice and runny I poured it into the moulds.  More excitement as the styro caught fire as it melted, much smoke and flame.  By this time, both paint tins were glowing a fine shade of cherry red and it was time to shut off the blower, brush off the ash and let the whole thing cool down overnight.

Castings in flower pots
The next day I knocked out the castings and reviewed the result.  The good news is that I had managed to turn a pile of scraps of aluminium into a couple of cast blocks, but on the bad side the blocks were irregular in shape with a lousy surface finish. After playing around machining them I decided that it was probably not going to be feasible to cast the parts for the engine - it would take too much experimentation to get a decent casting, so I have abandoned the casting idea in favour of using bar stock of various shapes and sizes to make the new engine.

Once I had decided to use bar stock I have managed to make some fair progress on the body of the engine.  The crankshaft is now made and reasonably straight - its more complex than most engines because this type of 2 stroke engine needs some positive air pressure to force the exhaust gas out of the cylinders and the fuel mixture in, so the engine has a supercharger arrangement for this purpose.  This also allows for some 'ramming' of the fuel mixture by having the intake crank slightly offset from the exhaust so that the intake ports are still open for a while after the exhaust has closed.  Time will tell if it works or not, but thats how the original full sized engine was made.

The assembled crankshaft with thrust bearings

Crankcase seen from underneath with the oil pump in position
Not to bore you with the machining details, but the crankcase is now more or less complete: the cylinders are made, and the cylinder heads are finished.  I now have an ignition system and a pair of miniature spark plugs and the whole lot roughly assembled.

One of the part finished cylinders assembled with the pair of cylinder heads
Crankcase with crankshaft and rocker arrangement in place

 The cylinders are going to be a bit of a problem, mainly because they are so big - the bore is 30mm and the stroke is the same, but because there are two pistons in each cylinder each one is twice the length that a 'normal' cylinder would be - these are around 90mm long, so I had to make a new set of extra long boring bars to make the bores. I also don't like working with cast iron, its filthy stuff and very dusty so it clogs up everything it touches and its a pig to clean up afterwards.

Not only that, but the iron I used has a very hard and coarse grain, resulting in a surface finish that is way too rough to use without further work.  After much chewing on this I have decided to make a grinder to fit on the lathe toolpost so that I can grind the bores smooth - it doesn't need to be very precise as I will grind the bores and then make pistons to fit them.  More on the grinding machine next time.

In between breaks on the engine, I have been making some more woody stuff. I wanted to make a small ring box, but didn't have enough wide timber for the flat part of the lid.  The Boss suggested that I make an insert from material instead, and the results are pretty good.

The ring holder part is a series of blocks of foam glued to a card base with spaces between each block, and the whole lot then covered in black velvet - simple and quick, and it seems to work well.

I am planning to expand this idea to make maybe some watch boxes or small cabinets at some point, watch this space.

I have also been giving some thought to my future artistic endeavours as well.  This deep thinking has been  prompted by a couple of conversations with shops - the first took one look at my ring box, and immediately said "it should have feet on it", then proceeded to tell me in great detail how the design was all wrong.  Hmmm.  Then another shop owner said she was interested in selling some of my stuff, so I sent her a load of pictures and got massive enthusiasm from her:  so I arranged to take over some samples for her to see and when I spoke to her later she said "the boxes are lovely but they are too chinese".  Wot?  She had already seen the pictures, and I had explained that I could make them in any material, but she wasn't listening.  It appears that she wanted 'shabby chic'.  Grrr.

This got me thinking.  I like to sell stuff, because the money helps me buy materials for other things (like the engine) and also affirms that people like my work enough to throw money at me. At the same time, I don't want to be churning out multiple copies of the same box/picture/butterfly/etc on a daily basis, especially since its the small stuff that sells best and there's very little money in that.  What I really like to do is to make one-offs, single objects that I make because I feel like it, not because I think someone might buy it, so I think I'm going to do more of that and less trying to persuade shops to sell my stuff.  Once I have a few pieces made, I may try taking them to a pukka art gallery to sell, although these tend to sneer at things made of wood - that's craft, darling, not art - or I may just keep them. More on this as I develop the idea, but I have some half formed plans burbling away in the background....

I've done some other stuff as well, notably a sign for the village.  During the arts festival last summer, villagers made a family of three people and a dog out of willow, and eventually got round to erecting it in the middle of the village. I was asked to make a sign for it, so I found a nice bit of oak and dusted off my signwriter's brushes and mahl stick, and this is the result -


Considering I last did signwriting in around 1976, it turned out pretty well, even though the willow sculptures are not my favourite thing

Last, we had the first kart meeting of the year a couple of weeks ago.  It was very, very wet, but the biggest problem was the low cloud which made it impossible to see the track
The track is the other side of that fence, honest
 
More to the point, nobody could see the marshalls and they could'nt see the karts, so we waited until around 2pm and just when we were all about to pack up and go home, the fog cleared and the sun came out.  Wet tyres for the first three races, with lots of people finding the hedge, then slicks for the finals. I did better than I expected, and didn't fall off or come in last in any of the races, so quite pleased with the day even though the late finish meant it was well after 7pm when I got home.

That's it for now.  Jon's wedding is on Saturday, looking forward to that, it should be a fun day for all concerned.  Next time should have some details of the tool post grinder and some more progress on the engine, plus maybe some more arty stuff. Try to keep the applause down to a dull roar, please.