About Me

I've been taking things to bits, and making things ever since I can remember, starting with dismantling knackered alarm clocks and watches and helping my dad fix the car. Now I have a well-equipped workshop and have aquired lots of new skills, so I can make better stuff. When they first appeared, I became involved with personal computers, and these and developments in electronics have increased the scope of the things that I can do. Just recently retired, so O yes, now I can make all sorts of stuff.....

Friday, 16 May 2014

Update for May

Well, having said that I would update this blog every month, I see that it is now May and this is only the third update since new year.  Whoops.

First up, my personal shout to Stephen Sutton. Unless you live under a rock you will all have seen mention of this guy on the news, he was diagnosed with bowel cancer at 15, and died this week at the tender age of 19. What makes him special is the way that he lived those four short years, and his cheerful positive attitude right up to the end.  His story is here -

https://www.facebook.com/StephensStory

He devoted his time to raising money for a teenage cancer trust, and started with a target of £10,000.  The last time I checked, he had impressed people so much that donations were up to around £3.7 million. I'm not sure if they are still accepting donations, but if they are please honour his memory by sending them a few quid, the collection web site is here - 

 https://www.justgiving.com/stephen-sutton-tct

He was an inspiration to us all and I salute him.  Vaya con su dios, Stephen.
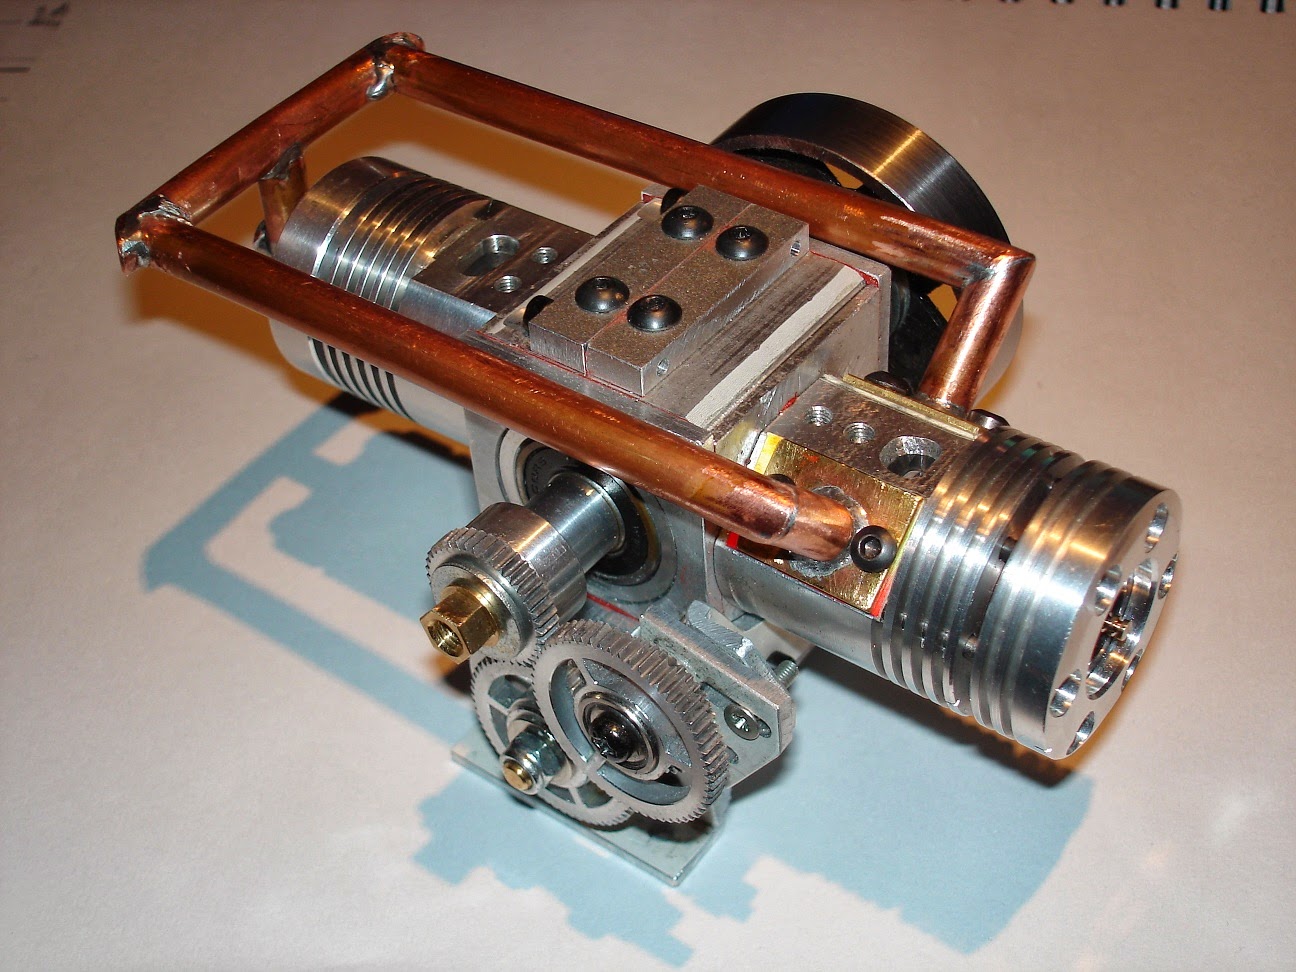
And now: The Beast

This is the new engine, woohoo!  Like the last one, its my own design although based on a real engine, and this one will be made a bit better to ensure that there is no repeat of the crankshaft waggling that we had on the first one.

First:  what makes it different?  The engine will be a 2 stroke, but will not have conventional cylinders - instead, it has a pair of cylinders mounted horizontally, with a pair of opposed pistons in each. One piston operates the exhaust ports, and the other the inlets, and they are linked to the crankshaft by means of a set of rocker arms and double conrods.  To make sure that the red-hot exhaust gas doesn't blow out of the carburettor (now THAT would be worth seeing!) there is a supercharger that blows the fresh mixture into the cylinders and forces the exhaust out through the right holes, and by offsetting the crankshaft slightly this can be used to slightly supercharge the cylinders.  This is the 'real' 3 cylinder engine on which this design is based with the side covers removed to show its innards.  

It was made by the Rootes Group back in the sixties and for its day it was a stonker in terms of performance and fuel efficiency (though some of the trucks that used it had a very short exhaust pipe that exited under the front bumper, and on a long hard pull up a steep hill the bits of red hot carbon flying out of the exhaust would often set the hedges on fire). It was also prone to running backwards if you were careless with the clutch, with the inevitable screaming runaway culminating in a spectacular explosion.  It was a diesel, but mine will run on petrol with real miniature spark plugs so that I can control when and for how long the plugs fire.

So far, I havn't made very much.  I have done a huge amount of designing and drawing, and now know what its going to look like, and have made a start on some of the oily bits.  The first is the crankshaft, since this is the bit that was pretty unsuccessful last time and I need to learn from those mistakes. Most model engine builders make the crank from a solid hunk of steel and machine off probably 90% of the metal to produce a finished part.  They also offset mount the shaft in a 4 jaw chuck on the lathe to turn the crankpins.  Well, I don't have a 4 jaw chuck, and chewing off that much material seems like doing things the hard way, so mine is fabricated from bits like these.

  I cut the six crank webs from 6mm steel plate and drilled them in a stack to make sure they are all the same.  Two of these are welded on to the stub ends of the shaft to make two identical end pieces, and two more welded to another short shaft make the centre bearing section.  The last two are pressed together using the crankpins to make the complete shaft.  Sounds easy, but it was a pig to make (I have the wreckage of the first few attempts littering the bench to prove it). The offset crankpins make the two halves of the shaft asymmetric, and pressing the pins into the webs in the right place was a 'mare involving a special assembly fixture and a lot of careful work with the dial indicator.  Once it was all pressed together, the clamping screws were tightened until they squeaked; all of the various oil holes drilled, and the crankpins permanently locked in place with hammered-in pins.  The finished article was mounted in the lathe, where of course it wobbled all over the place, but I machined the three main bearing journals down so that they all ran true and Robert is your Mother's brother.  Carefully blow the swarf out of the oilways with compressed air, and that bit is done.

I've also made a stack of bronze bearings.  Once again, the traditionalists take a very very expensive chunk of phosphor-bronze and machine almost all of it away to produce a thin sleeve bearing.  Instead, I used readily available bronze Oilite bushes (cost a few pence each) and split them lengthwise with a Dremel cutting disc.  Solder the split edges together, turn the inside diameter first and press on to a mandrel to skim the outside, then de-solder to make a pair of split shells.  Worked a treat, the picture below shows the first pair of big ends in the prototype con rod..

I've also made a set of conrods and rocker arms as prototypes and am in the process of making a full set based on these.  The rods are made from 6mm steel plate, welded up to make a 'fork' shape and then bored at both ends.  The crankshaft end has to have a detachable cap and split bearing so that it can be assembled and taken to bits if needed.  The rockers take most of the force in this engine so they have to be pretty massive - they are made from three steel discs, welded to a pair of 3mm thick steel ribs on a jig, and then bored for bearings.

There's still loads to do, this isn't going to be a quick one by any means.  Next up will be some of the ancilliary bits like the oil pump and supercharger, and then I'm going to try my hand at casting the engine block, cylinder jackets and pistons.  Keep a look-out for smoke to the south west, and keep the animals and children indoors for a while.

Next up, some karting. Took the old girl out for a race last Sunday, and I'm pleased to say I managed a bit better.  Last month I was awful, way behind the rest of the gang, and when you are just banging around on your own its nowhere near as fast as if you are chasing someone.  It also gives you too much time to dwell on how much your ribs and forearms hurt, or how your head is just flopping around from the G force by the end of the day.

This time it was much better.  Equipped with my first new set of tyres since last August, I put in some half decent lap times and stayed with the pack for most of each race, while changing the carburettor jet and playing with tyre pressures seemed to help as well.  Got pulled in by the scrutineers at the end of the last race and he mentioned that the variable exhaust valve was set around 2mm too far out - doesn't sound like much but on these little engines that may have a major impact, so I've set it up according to the instructions and we'll see what difference it makes.  Next outing is a practice day at Dunkeswell in July, no racing in June as I will be in Spain :-)

Just to prove I don't spend all my time hammering metal, I made a coffee table for Sean and Mad.  Its a pretty simple design, although lots of agonising over dimensions to make sure that the proportions came out right.  Its made in english oak, hard work to cut because the grain is very short and the wood is so hard, but when its finished the texture and colour of the wood is fab-u-lous.


It has a drawer that blends in with the sides, and a hidden finger pull and self-closing hinges, but it doesn't have the built in wireless charging mat; the hidden USB ports and the blue LEDs that were originally on the build list, probably just as well.  I'm really pleased with it, probably going to ask to borrow it back for the -tada! - trumpet fanfare....:--. 


Middlezoy arts festival!  The village is running this two day event in July with all sorts going on, full details are on their web site here:-

http://www.middlezoyartsfestival.org.uk/

I am one of the artists exhibiting.  I will have as many bits as I can muster on show - cabinets and boxes, as well as some engravings and maybe some other stuff - and I will be doing live engraving demonstrations.  Lets hope that the weather is fine all weekend, and that de good lawd doesn't take exception to me being in the village chapel and visit us with a couple of thunderbolts, that would pretty much ruin the day.

Part of the festival is a garden art competition, and for this I shall be making a golden eagle, and a family of snails.  More on this next time, or if you come to the festival you can see them for yourself!

Despite being retired and loafing about all day, every day, its time for a holiday so we're off to sunny Spain at the beginning of June.  We're going back to La Herradura again, we know the area well and it should be a fine relaxing time with an apartment right on the beach and in easy stroll of the bars and restaurants.  See you when we get back


Thursday, 27 March 2014

Update March 2014

Time flies when you're having fun, or hunched over the lathe for long periods.  This month's update is mostly about The Engine, and I have delayed writing this blog until the engine was or wasn't running, so here we go.

 Last month I had just about finished the cylinders and crank, and about to start on experimenting with casting the alloy parts. Well, after thinking about it for a while I decided to re-design the parts so that I could make them out of sheet and other materials using my little hammer. Casting is OK, but I wanted to get this engine finished and I assumed that casting parts would be a lot of trial and error, so fabricating would be easier. The crankcase was hammered into a U shape from 3mm alloy sheet, with another piece of 3mm bonded to it with epoxy to provide the mounting base for the cylinders.  The end covers were also cut from 3mm alloy with the bearing housings turned from bar and pressed into the end plates. Once hammered into shape, all the parts were machined on the mill to give clean joint faces and to make sure that the whole thing was square and dimensionally accurate.

Here's a couple of pictures with the crankcase roughly assembled, with and without the end plates - the copper pipes are stubs for the inlet manifolds, more on this presently
 
The two halves of the crankcase are dowelled together to ensure they stay in alignment, and the end covers also have dowels for the same reason - this proved to be a good plan, as I lost count of the number of times I had to assemble and dismantle the whole thing while checking that all the bits fitted properly

The next job was to press the two halves of the crankshaft together on the big end pin.  This proved to be a real challenge for several reasons.  First, the difficulty of holding the two halves of the shaft in line with each other while pressing the pin into place:  I ended up with one half in the headstock chuck on the lathe, and the other half in the tailstock chuck, then fiddled and faffed until the big end hole was lined up (done mostly by eye). 

Very fuzzy pic of the innards of the oil pump
Second, pressing the big end pin into place.  I have a little bearing press, and with the simple addition of a length of steel pipe on the handle there is more than enough pressure to belt the pin home.  However, the press fit has to be very tight (don't want that little sucker letting go at speed, do we?) and pressing the pin home raised a tiny steel burr under the shoulder at the end, which made the pin sit slightly wonky - not visible to the naked eye, but once test assembled into the crankcase the wonkiness nearly pulled the crankcase apart.  It took numerous attempts and several pins, before the pin was made to press home square to the shaft and although there is still some slight runout on the shaft its not bad.
Oil pump mounted on end cover and gears in place
Next up, the oil pump.  I made the gears out of brass and the housing from a chunk of alloy bar, bored out and drilled, and with bronze bushes pressed in for the gears to run in.  The idea was to mount the pump to the outside of the end cover and drive it from the end of the crankshaft via a train of gears.  (This is when I discovered that my gear cutting setup sometimes cuts the teeth slightly off-centre, time to invest in a better setup with a more accurate chucking arrangement).  To my considerable surprise, the pump actually worked when I spun it with a power drill in a puddle of oil - I tried with engine oil and it struggled, but the good old 3 in 1 oil was fine.


Final assembly with flywheel and transfer manifold
That's pretty much all of the parts made and fettled so that they fit properly so its time to start putting the thing together for real.

Because the big ends on the conrods are not split, they had to be assembled when the big end pin was pressed into the crank.  This left the crank with pistons hanging out either side, which is why the split crankcase was needed - its the only way to assemble the whole caboodle together.
So, first assemble the oil pump to the end cover; next, press the ball races on to the crank;  put the crank into the crankcase and bolt the two halves together; then insert the pistons into the cylinders (very fiddly business with the two rings on each piston) and bolt the pistons to the crankcase.  Does the whole thing still turn over?  Yes, though a bit stiff as expected. Fit the oil pump drive gears and adjust the backlash, squirt some oil into the sump and the cylinders, and we're ready for a bit of a test run with the ol' Black and Decker.

... and seen from the other side
Woohoo, so far so good, the only problem seems to be the oil pump bearings are not snug enough to stop oil leaking out along the drive shaft, so a bit messy but otherwise OK.

Next up, the transfer manifold.  I experimented with all sorts of options for this - it has to carry the pressurised mixture from the pre-charge cylinder into the firing cylinder, with pressures of around 10 bar, so it has to be pretty sturdy.  I ended up fabricating it from some copper pipe with soft soldered joints - not very efficient, but for this prototype it will do.  Last item is the flywheel, made from a chunk of steel pipe with a plate welded across, it ain't pretty but it works. Last addition, a piece of copper plumbing pipe to act as a silencer and catch the exhaust gunk.
Finished and ready to run

Glow plug in and carburettor mounted on a short piece of flubber hose - quicker than making a proper manifold. I have made my own carburettor, but a) its huge, and b) I have no idea if it will work so if the engine fails to start I won't know if its the carb or the engine.

Right.  Clamp the whole thing to a bit of wood in the vice, attach the fuel tank and various bits of pipe, and give it some with the power drill. Several hours later, it eventually started and ran for a few seconds.  I know it was actually firing, because the cylinder head and exhaust got hot, but it turns out that starting easily is not a feature of this engine. After many hours of fiddling I eventually got it running for a few minutes  (the video goes on a bit, and its all much the same...)


It may not be obvious in the video, but by this time the two ends of the crankshaft had become slightly deranged, resulting in massive vibration (enough to shake all the tools off the bench) which rapidly began to shake the fabricated crankcase apart.  Not keen on seeing how long it takes before hot bits of oily metal start flying through the air, so it probably won't be running again.  I've learned a huge amount during the build, and seeing it actually running has prompted me to set to work designing another one - this will have two cylinders and better port timing, plus a bigger flywheel, as I think these are the main reasons why the engine was so hard to start.  For a taster of what the new engine will be like, google for 'Commer TS3', and if you tell me I'm mad I'll slap you with a kipper.

That's all for this month, I need a rest and time to clean up the workshop :-)

Tuesday, 11 February 2014

First post of 2014 woohoo!

Well here we are again, another new year and another round of posts, hopefully monthly as usual.  A bit late in starting as Mr Google decided to change the blogger interface so you now need to get a spade out to dig for the information that lets you post a new entry - why? National security?

Anyhoo, some good stuff going on already this year, so lets get started.  First up, a couple of WTF?? things.  

The 2013 Harley Davidson Super Glide Custom A 1,585cc Harley-Davidson Dyna Super Glide, donated to Pope Francis last year and signed by him on its tank, is displayed ahead of Bonham's sale of vintage and classic cars, at the Grand Palais in Paris, Wednesday, Feb. 5, 2014.First is the announcement a couple of weeks ago that the Pope was going to auction off a Harley Davidson motor bike for charity.  He was given the bike to celebrate the H-D centenary and he graciously signed the fuel tank before letting it go for sale.  Raised a load of dosh for good causes and therefore a Good Thing.  My question is: what in the name of Mother Teresa were H-D thinking when they gave him the bike - its not an obvious marketing thing (not many Hell's Angels look up to the Pope after all), and the image of his Popeness tearing along the autostrada clutching his skull cap and with his white silk robes blowing up over his head is one that I'd prefer to forget.

The second news item is a Well Done!!! to the bloke who arrested Tony Blair in a posh restaurant a couple of weeks ago.  Apparently the bloke in question was a barman at the eatery and when he spied Our Tony shovelling expensive nosh into his face he trundled over and attempted a citizen's arrest (which he is quite entitled to do) for the crime of getting the UK into what some perceive as illegal war in Iraq.  To be fair, Tony did a good job of dodging and weaving and managed to avoid being dragged off to the local nick, but I imagine that his bodyguards were a bit flummoxed - they are supposed to protect him, but if the perp is a righteous citizen carrying out a legal arrest they're a bit banjaxed.  Anyway, 10 out of 10 to the barman whose name is Twiggy Garcia and who quit his job immediately after.  Not all bad for ol' Twiggy though, as there is a running bounty payable to any potential arrestors and Twiggy picked up two grand from them for his efforts.  A good result all round, except that Tony is still walking the streets instead of sharing a damp cell with a man named Bubba.  Check out the story here

On to other things, and the first of these is the engine.  I've managed to get quite a bit done on this over the past month or so.  I was originally going to make a twin cylinder engine, but part way through making the first parts I realised that because I had no idea if the thing would start and run, making a double lot of parts for what might end up as an inert lump of metal was a bit of a waste of time.  Instead, the design has changed to be a single cylinder jobbie, but keeping the pre-charge cylinder arrangement.

So far, I've made the following:

- Cylinders, liners and heads for both the pre-charge and firing cylinders
- The crankshaft and con-rods, with bronze bushes for the big and little ends
- A pair of pistons, complete with two cast iron rings each and pressed-in wrist pins
- The gear set to drive the oil pump off the blunt end of the crankshaft, pump gears are under construction now


Firing cylinder, head and piston
The cylinders are cast iron, with an aluminium jacket machined from bar and pressed on to the cylinders, and the inlet and exhaust ports machined through both metals.  Making the jacket from alloy was pretty tedious, as it takes ages to bore out and wastes a ton of material.  Not only that, but machining flats on the outside to attach the manifolds is not the strongest way to do this, so for the next version I will cast the jacket with manifold ports cast in.  The heads are just machined from bar.

The crank is made in several parts - two steel end pieces machined from bar and each pressed hard into a circular web plate, and the big end journal pressed in good and hard to both webs once the conrods have been fitted.  Not finished this bit yet, as I need to make a jig for the pressing together part to ensure that the two halves of the shaft are dead in line or the engine will run like a 1956 BSA.


Crank halves; conrod blanks, piston and cylinders
The pistons were a challenge, because they need a slot machined inside for the conrod to flop about, plus a very central hole for the gudgeon pin.  As if that isn't enough, the piston rings are minute - cross section is 1 mm x 1mm - and very fragile, so we have a small pile of broken ones.  Lucky I made a few spares :-).  I made the rings by machining a cast iron cylinder, lapping the outside and then parting the rings off .  Careful polishing of the faces so that the ring fits the groove properly, then split each one with a cutting disc in the Dremel and trim the ends of the split carefully to give the required 0.004" gap when the ring is placed loose in the bore.  To cap it all, the rings need to be stopped from rotating, as if the ends coincide with one of the ports the ring will snap and cause some serious grief.  The only way to stop them turning is to drill the piston with a 1mm diameter hole, press in a pin and grind it down to leave around 0.3 of a mm sticking out into the groove.  Then file a recess in the back edge of the ring around 0.5mm deep and hope it doesn't bind when it finally gets assembled.  Fat fingers are NOT an asset here.


Oil pump drive train plus one of the brass pump gears and its bearings
Although this will be a 2 stroke, I'm keen for it not to run in the traditional cloud of blue smoke - this is part of the rationale behind the pre-charge cylinder, because this will not need oil mixed with the fuel for lubrication.  However, there needs to be some way of oiling the crank, pistons and other whirly bits, so she's going to have a proper gear oil pump with a wet sump.  The drive for this will come off the blunt end of the crankshaft, through a train of gears that reduce the speed of the pump (since apparently slower pumps of this type work better than faster ones).  I made a whole bunch of gears for the Magic Clock a few months back, so making these was pretty straightforward although a 60 tooth gear takes around an hour to machine, one tooth at a time.

Trial assembled whirly bits
Once the gears are finished the only easy bits left to make are the flywheel and the manifolds.  I'm not sure how big and/or heavy to make the flywheel yet, and it will need some means of starting to be built in as well - I'm planning to use a cordless drill to spin it over, not sure how yet.

The last adventure will be the casting of the crankcase.  This will need to be split in two halves to allow the oily bits to be assembled, and it will have a pair of end plates which will carry the ball bearings for the crank as well as the oil pump and gear drive.  I  plan to melt the alloy in a tin can, heated to red heat in a ceramic flower pot full of charcoal and retained in a metal paint can with a hair drier blasting air up through the charcoal to give it mucho hotness.  I have all the parts except the metal paint can, so I'm checking all the builder's skips that I come across in the hopes of recycling one.  I've already made the patterns for each part out of styrofoam, and I plan to coat each one in a plaster mix before packing them in sand and pouring cellulose thinners in to melt the foam and leave the cavity in the sand behind.  It may not work, but at least I can keep re-cycling the mistakes until I get it right.

Almost last, the airbrush has seen some more active service with some decoration on the side pods of the kart.  Plain black is not a good racing look, so I played around with a variety of different ideas but soon realised that the water-based acrylic pains that I have are just not intense enough in colour.  I need to play with the proper solvent-based ones, but as these run at around a tenner per pot I'm reluctant to shell out for these.  Instead, I opted to paint something which doesn't need a strong colour, and the answer is FLAMES!.  I doubt that they will survive the first race, but I had a lot of fun painting them

And finally:  the Tourette's Parrot.  We were at the pub a couple of weeks ago and the landlord Graham had a fine green parrot climbing all over him.  I admired the bird, as you do, and asked how he came by it and he said that he rescued it.  It turns out that the bird can talk really well, but hates children - so much so that it launches into the foulest language imaginable every time it sees one, and since the previous owners were expecting their second child they were understandably keen to offload the foul-mouthed critter.  Most Excellent, havn't laughed so much in ages.

Next month we should have a full report on the alloy casting adventure, plus I need to fit a new towbar on the Boss's new car before the first race in mid March. Oh, and the Magic Clock has lost one of its LEDs, so I need to fix that

Monday, 30 December 2013

Xmas and new year update

Well, here we are at the end of one of those 'good in parts' years.  This is the usual round up of recent activities and a peep at what is coming next in 2014.

Let's start with OB's chess set.  He has shown an interest in playing chess recently, and you can't play unless you have a board and pieces to play with, so between us we knocked up a set for his birthday.  (We have a weekend in December every year when the grandkids come to stay and while Charlotte goes off shopping with the Boss, OB and I make stuff in the garage.)

I couldn't face the thought of trying to turn up 32 assorted chess men - I don't have a wood lathe, and although I can turn small stuff in the metal lathe its not something i would describe as a 'core skill'.  So instead we made a more contemporary set with all of the pieces made from square timber with various shapes hacked into the top ends - so a rook has grooves reminiscent of battlements; the bishop has a pyramid-shaped point, and the knights look like..errrr.... horses.  Pawns are plain blocks, and the kings and queens have machined alloy 'crowns' and a bit of groovage on the flanks.  Once set up it didn't take long to finish them, and although they could probably have done with another coat of danish oil, they look fine.
I made a board for myself a while back, and realised that with a bit of care I could cut precise squares on the radial arm saw (the Saw of Oblivion) by setting up an end stop and trimming the squares across both length and width.  The fine saw blade gives a clean cut, and the bits don't need any further work before sticking them to the baseboard.

The base is made from two sheets of 6mm plywood, glued back to back and at 90 degrees to each other to try to stop them from warping. A bit of careful marking out and I glued the squares on to the first quarter of the board, making sure that each piece was snug against the ones around it.  Once this part was dry, repeat for the other three quarters, then trim the edges of the whole board very carefully on the saw so that the plywood and the squares were flush.  A quick edging of beech, a bit of heavy sanding with the sanding machines and all done.

So that the pieces and the board stay together, we made a box to fit under the board.  I had some nice pieces of oak that we cut to form the sides, with the corners cut with finger joints made with a straight cutter on the dovetail jig.  Some 3mm ply for the base, a set of rubber feet, a pair of brass hinges and a ball catch to hold the lid on and we're done. Last job was final sanding and a hefty slap of danish oil applied with considerable style by OB to bring up the colour of the walnut and maple squares on the top.

Looks really good, OB is pleased with it, and it saw a very close run draw between OB and Jon on Chrismas day.  Mission accomplished.

Next up, we've been looking for a long time for a replacement for the table lamp in the hall - it has been around for ages and  doesn't really go in this house.  After exploring other options I decided to have a go at making a shoji-style wall lamp.


I've left off some of the obviously Japanese-looking details, and focussed instead on a simple structure with very slim frames - although the wooden parts are very slim, the cross-halving joints give the whole thing a surprising amount of strength and it works pretty well.
 The framework is made from cherry, and the bulb is hidden behind a sheet of hand-made paper with a very coarse texture which softens the light quite nicely.  Unfortunately it uses one of they new-fangled low energy light bulbs which give a light that is a bit too white for my liking, but it does the job OK.  I'm not too happy about the cable dangling underneath it, so I think I'll get me little hammer out and hide the wire inside the wall.


Last month I mentioned the music player I had built using a Raspberry Pi and a some software called 'music player demon' or MPD.  The Pi reads my music library off the server and pours it out of its audio port into an external amplifier, with the control of what it plays being driven by an app on any android or tablet, or iPhone. If you've ever looked at Sonos kit, that's pretty much what it does.

MPD Pi in its case
Its been running for the past couple of months, and I've tried a number of different apps to control it, and having run it for a while upstairs in the study it recently was moved to the kitchen.  Its a good measure of how easy it is to use, and how well it works, in that the Boss is happily playing some bangin' choons on it right now downstairs in the kitchen.  

The MPD software runs on the linux Pi, and can be downloaded from here.  There are several apps available, I've only tried the free ones and in my opinion the best for the iPhone is called MPoD.  For android there is a much bigger choice, my personal favourites are MPRemote and MPDroid. It works so well that I will probably cough up the cash for a couple more Pis (Pies?) and put one in the lounge and one in the study.

Last in the list of things for this month is the model engine.  Well, not built yet, but I've been doing loads of research and designing and we're about ready to start ordering materials.

I'm expecting it to take a few months to build, with a fair bit of trial and error along the way.  I've wanted to build an engine for years, and having done my share of rebuilding 'real' engines I know that there's nothing like that moment when an inanimate and slightly sulky pile of oily metal parts splutters into life for the first time and becomes a living breathing thing.

Prototype carburettor
The design will be a bit different.  Its a 2 stroke for a start, with two horizontally opposed cylinders, and because 2 strokes usually use the crankcase pressure to 'pump' the fuel/air mixture into the cylinder, this arrangement will not work as the opposed pistons cancel out the pressure.  Instead it will have a secondary pair of cylinders that will suck in the charge, compress it and then deliver it into the 'firing' cylinders for the 'bang, whoosh!' part.  I came up with this idea by accident, and only later discovered that the bloke who originally invented 2 strokes used this on his first engines.  If I think about it a bit, there's no reason why I can't use the pre-charge cylinders to act as a supercharger.

... and seen from the other end
It will also be quite big, because making something as complex at really small scale is very difficult with my chubby fingers, so the capacity will be about 12cc, and the overall dimensions around 140 x 80 x 60mm.  I could machine all the parts from solid chunks of metal, but that is an expensive way to produce a floor full of swarf so I plan to try my hand at casting some aluminium.  I reckon I can build a simple furnace with a couple of clay flower pots, a hair drier and some charcoal bricks, and I can make the patterns for the castings from sand-packed styrofoam which vanishes in a puff of smoke and flame when confronted with boiling aluminium.  


So how far have I got?  Designs are finished enough to make a start on hacking up some metal, and I have made a simple carburettor (probably the most complex part of the lot) out of alloy bar and brass just to prove that the design works - tested it by putting the fuel feed pipe in a jar of water and blasting compressed air through it, producing a very satisfying mist spray out of the other end when at full throttle, though it took a while to mop up the puddles afterwards.  I've made some patterns for the 'real' carburettor and am about to start on the ones for the crankcase and the various manifolds before getting to grips with building the furnace.  Woohoo, can't wait.

I also am pleased to report that the tradition of making things from bits of junk appears to be hereditary with Sean's recent completion of a gyro-controlled camera mount.  Works a treat, as seen here in use on a bike, and an earlier version with a few glitches here on the back of the motor bike - we should call this one 'buttock-cam'.  Great job, and all based on a couple of bits of scrap aluminium hammered into shape in my workshop a few weeks ago.

A quick medical update as well.  I finished the radiotherapy mid-November, and as expected the major lethargy from that has taken a while to wear off.  I'm feeling almost back to full working order now and planning a new fitness regime starting this week with a view to getting back into shape and removing the flab round my middle (caused mostly by the hormone treatment, but not helped by my not training since April)  and getting back into TKD training by the end of January all being well.  Next steps are a follow up with the prostate team next week, and another with the haematologist at the end of January, fingers crossed but I'm not expecting any significant things from either of those two events.

An what of 2014, I hear you cry?  Well, the main tasks are going to be building the engine, and getting the kart ready for a full season's racing with a determination to come somewhere other than last.  I also have a coffee table to make for Sean and Mad, and OB has an arduino now, so probably a good deal of telephone and on-site support will be needed for that.  Having started the model engine work, I've also been looking at the design of the very old Commer TS3 engine, made by Commer trucks in the UK in the 60's and discontinued by them when Chrysler bought the company.  This engine was a supercharged three cylinder, opposed piston two stroke diesel with a distinctive exhaust sound, and I rather fancy making a working model version of one after the first engine is up and running.  The old timers among you may remember these engines, they had a nasty habit of kicking back and running in reverse with rapidly increasing revs and an inevitable very messy and noisy end - I once saw a driver  leap from the cab of his truck and leg it away from the vehicle at amazing speed just before the engine burst, filling both the cab and the roadway with oil, smoke, and bits of very hot metal.  I'll try to avoid that fate if I build one :-)

Onward and upward.  Time to order some metal and locate a couple of flower pots for the furnace, I promise lots of pictures for next month.

Friday, 8 November 2013

Airbrushing and some other stuff

Its been a bit of a slow month with construction projects.  I started radiotherapy on the 30th September, and the daily visits to the hospital kinda take up a few hours of every day, and not leaving much time to do stuff.  The radio is going well, the only side effects so far are a bit of tiredness (probably due to getting up early every morning, something I've got out of the habit of since retiring) and the need to pee a bit more frequently than usual. The staff at the cancer unit are fantastic, and us patients have a good old laugh while waiting our turn on the machine, so I will almost be sorry when the fun comes to an end on the 19th.

In spite of this malarkey I've still managed to get some stuff done this month, so here goes:

Cherry blossom airbrushed on wall
First up, the airbrush.  I've been prowling around looking for things to paint ever since I got this magic gadget, and have finally found a couple of targets.  The first is a bit of cherry blossom on the wall of our bedroom - much agonising before starting spraying, and its turned out a bit darker than I wanted, but for a first attempt its not ended up too bad.  The worst part was lugging the compressor up and down the stairs, it must weigh around 50 kilos so its not exactly portable and the corners start to dig into your hands after 10 seconds or so.

Cherry blossom detail
Making the masks from adhesive masking film is easy enough, but this stuff is a bugger to stick to the surface - the static in the film makes it jump out and stick to everything it sees, and getting the stuff to lay flat on the surface is a nightmare.  I decided after this little episode to try sticking on the plain sheet first and then cutting the masks in situ.

Top frame of bed with leaves
Having done the wall, it seemed a good idea to add a few leaves to the top bed rail as well.  It needed a new coat of white paint anyway, so I gave it the airbrush treatment while it was in the workshop.  It came out pretty well, although the same problems with positioning a pre-cut stencil meant that a couple of bits got missed.


Racing tortoise on spare side pod
Pumped up with these successes I decided to have a go at the kart side pods.  These are black and boring, so I have been looking for ways to brighten them up for a long time.  Of  course, they take a bit of a bashing on the track, so I'm not expecting the paint to stay on for long, but I thought I would try the process on the spare pod that we have and see how it turns out.  This time, I stuck the mask on in a single sheet, and then cut it in position - its certainly easier doing it this way and if I don't lean too hard on the scalpel there's no visible cut marks on the plastic pod.

I've learned a few things from this last item.  First, the background really needs to be a good solid white to give the colours some brightness, but the acrylic white that I have is just not man enough for the job so I will try some white car primer next time, it should key well to the plastic and will give a good matt surface for the acrylic.  Second, the paint is all water based, which makes cleaning up easy but it takes a long time to dry in between colours, so I found that a quick blast with the hair drier dries each coat nicely. Third, spraying through a bit of old mesh material gives a neat spotted effect which suggests reptile scales.  And last, don't shake the airbrush when its full of paint and the cap isn't on the paint cup  :-)


I'm encouraged enough by this test pod that am planning to do the real ones as soon as I can  pluck up the courage, though I'm not sure whether to go with the tortoise or something else.  Are we going to look good next season, or what?

The other major project this month has been to turn my Raspberry Pi into a dedicated music player which can be controlled by a phone or tablet. 

I've had this little widget for some time, and had always intended that it would eventually end up being built in to a spare monitor to run a home information screen, showing things like the state of all the door locks; temperature; calendar events coming up; to-do lists; weather, and so on. It runs a slow but adequate version of linux and all I would need to do would be to build a 'home control' web site:  however, this proved to be a bit of a problem because all of the web browsers are either a) slow; b) won't display all of the content, or c) both of the above. This has put a bit of a stopper on the project and while I puzzle out a solution the Pi has been relegated to a test bed for the stepper motor in the Magic Clock.

I have decided to buy an Android tablet, and this prompted me to think that the home control information would be easy to display on this kind of device.  While thinking this through I wondered how to play music through a tablet without downloading 5000 tracks to the device, and this led me to start looking at ways to do this in various places in the house without having to turn a PC on.

It turned out to be much easier than I thought it would be.  Basically the Pi needs to download a free app called MPD, then another free app called MPDroid on the tablet/phone, a bit of configuration and we're off!  I also bought a neat little case for the Pi for a fiver from a nice man on ebay to give the whole thing a professional appearance.

The Pi runs on the house network (this one is wired at the moment, but will use wireless in the kitchen where there is no handy network point) and is mapped to the server where all the music files live.  The tablet/phone shows a list of all the files and allows you to select the music you want to play and change the volume - I'm still playing with it, but I think you can also set up playlists.  It works a treat - surprisingly, its quite quick, and its pretty neat to have music playing in one room and be able to turn it up or change the track from another room. The plan is probably to buy a couple more Pis? Pies? Pees? to run in the kitchen, lounge and in the landing/study area.

And last this month is a picture of me and OB being pirates.  Shortly after the picture was taken he said something so funny that I was absolutely helpless with laughter for about five minutes, and sitting in the hospital waiting room the next day I remembered what he had said and started giggling again.  Yo ho ho and a bottle of rum


Next month:  radiotherapy finishes on the 19th, so more time to start butchering wood and such, and a new car on its way for The Boss, plus the build up to Xmas and we may have the new tablet by then. I'm also looking a designs for a 3D printer and/or a 3D milling machine (same guts, different foo-foo on the top), thinking of building one of they sometime soon.

Tuesday, 1 October 2013

October update

Doing stuff is still getting in the way of writing bloggery, and this is how it should be, so this is the current state of the game at the end of September.  The main events this past month have been the Magic Clock and the airbrush, and in response to a couple of constructive comments I am trying to include more pictures and a bit less wordage - however, I've never been a man to use ten words when a hundred will do, so its unlikely I'm going to change now :-)

First the Magic Clock.  I've been banging on about this for a couple of months now, ever since I discovered that I could make gears on my little milling machine. Well, here it is, pretty much finished.
Magic clock - finished
"What makes it magic?" I hear you cry, so this is why. Although the clock is powered by electricity, it continuously stores a record of how many steps the motor has done since midnight on a small SD memory card and uses this to remember the time when the power is removed and when the juice comes back on it 'fast winds' to the correct time and then resumes normal timekeeping.  As it runs normally, it constantly checks that its not running too fast or too slow, and if it is it automatically adjusts itself.  Its seems silly, but unplugging it for half an hour so that you can watch it catch up is one of those things that you never tire of. Here is a short video of it just finishing its starting up routine:-


Goncalo alvez block with black streaks
The observant ones will notice that it fast winds, then hesitates before doing another quick squirt:  it does this because the startup winding can take a couple of minutes and it makes a secondary adjustment to compensate for this.   There are two LEDs on the front, one to show that its powered up and the other flashes when its making an internal adjustment.

This month I've made a big push to finish it off, starting with the purchase of a couple of hefty slabs of goncalo alvez timber and a less hefty chunk of black walnut, both from my local woodyard.  The goncalo alvez is a reddish timber with random dramatic black streaks, so I cut the chunk to make the most of these. Finished with danish oil and beeswax, all of the wood will gradually darken to a richer colour over time.


Fixings and cable grommet
The visible part is the brass mechanism - basically a pair of drilled plates with brass gears which make up the correct ratio between the minute and hour hands, and with a secondary gear train to the stepper motor which drives the whole thing.  No big deal in this part, other than the need to cut the gears and drill the plates with a fair degree of accuracy to ensure the train runs smoothly and without too much backlash.  It even has its own hand made miniature custom spanners to lock the hands on to the spindles

The mechanism is intended to appear to be hanging in mid-air and is contained in a glass fronted space to keep the dust and inquisitive fingers out. 
Stepper motor and drive module

The stepper motor and controller module came from China at a ludicrous price of around three quid including postage.

The part that drives the stepper motor is an Arduino microcontroller with a few add ons - a module to hold a SD memory card; a real time clock module, and the controller module for the stepper motor. All of the modules and the Arduino came from my friends in China with a total cost of around fifteen quid.

The software is in two parts - one to set the whole thing up, and the other to run the clock.The setup routines set the real time clock module to the current time, and creates the SD card file with a zero entry.  Once the setup routine has been run, the mechanism has to be physically set up with the hands pointing directly at 12:00 before loading the 'run' software.  The clock reads the data from the card (zero the first time out), compares it to the 'real' time and calculates the number of steps that the motor needs to run in order to catch up.  Once the fast wind is completed, the clock also calculates how long this process took and kicks the motor the right number of steps to compensate, then settles into a routine where it pumps the motor by n steps, compares the result with the 'real' time and makes any required adjustments by either pumping in a few more steps or stopping the clock for a few steps-worth.  In practice these adjustments are only around 10  - 15 steps worth (there are 36864 steps in an hour) and occur every couple of minutes - at the moment the software is full of information messages which affect the running speed of the software and I expect to be able to fine tune it better once the software is cleaned up a bit more. All along the way the number of steps completed by the motor is saved to the SD card, and the next time the clock is powered up after a power failure it reads this number and resets the clock.  Simples.

The software has taken me a fair time to write, C++ not being my first language, but with a lot of trial and error and help from Jon with the SD card it now works. There is loads of online help for these little computers, but although there are countless examples to play with, none of them ever seem do what I want to do.  Unfortunately - like there is in the linux community - there is also a fair number of self-styled 'experts' out there who when you ask a simple question make it their mission to make you look as stupid as possible instead of giving a plain answer, or giving a solution that is so complex that its impossible to understand. I have to assume that these people a) are twelve years old, and/or b) have a very small willy. If anyone wants to have a laugh at my code, or even have a go at building their own version of the Magic Clock, let me know


Rear access plate
The electronics are crammed inside the wooden slab, mounted on a metal plate to allow them to be slid out in case of internal derangement.  I'm expecting that the SD card will probably be the part that is most likely to fail, so I've made it accessible from outside with a retainer to prevent it being popped out of its slot by accident.

It was a real pig to hack away the wood to make the space for this, and in retrospect I realise that I could have split the slab in half and routed out the hole in both halves then glued it back together again.  Didn't think of that at the time, so it was out with my Japanese chisels and my little hammer.


Japanese oire nomi chisels

Not clock related, but every time I use them I realise again how spectacularly good these chisels are.  They are made from the same type of laminated steel that made the Japanese swords so good at taking and holding a keen edge even after hacking up a few assorted bad guys.  The steel is  heated up and hammered flat, then reheated and folded over on itself before hammering flat again:  repeat a few hundred times or more and the steel develops the ability to be hardened to a higher level than most other steels while retaining its strength and chip resistance.  The chisels don't do much in the way of bad guy hacking, but they take a fantastic edge and hold it through a lot of hard timber.  By contrast, the english plane blade that I have had for many years takes a fairly decent edge but loses it very quickly, requiring frequent re-sharpening throughout even fairly light wood butchery, and this is the case with pretty much all of the newer tools that I have - the steel is mostly selected for its cheapness and not its quality and it is increasingly difficult to get any kind of a tool that works properly. I especially hate the tools which claim to be 'titanium coated' but which actually seem to be  made entirely of cheese with a lick of brown paint.  Having recently seen a bloke making axe heads with a tray of hot coal, a big 'ammer and an anvil I'm tempted to have a go at making my own Japanese steel edge tools.  Watch this space.

All of this has taken up most of September, and because I wanted to get the clock finished before starting anything else, it has diverted me away from my other exciting new foo-foo which is my new Chinese Airbrush.  

If you search the 'web, the general view seems to be that some of the best airbrushes around are made by a company called Iwata.  They may be good kit, but with prices starting around £100 they are outside my budget, so I'm off to China via Ebay.  Well, blow me down, here's a Veda WD180 airbrush which is pretty much the identical jobbie to the Iwata HP-SB (priced at around £180) at a bargain price of twenty-five quid including postage.  Found some online reviews which rated it pretty highly, so worth a punt.

Veda WD180 airbrush
Well the little beastie arrived a couple of weeks ago after the usual 3 -4 weeks shipping, and its an absolute ripper.  Beautifully made and finished, and comes in a padded box just like the real thing.  In fact, its so much like the real thing that I suspect that it is made in the same factory as the Iwata.

I have a limited number of paints that I can use with it, and have only played with it a bit so far, but the first impressions are a) its a great bit of kit, works a treat, and b) its fiendishly hard to use.  The trigger presses down to release air, and pulls back to open the needle to let the paint into the airstream, but getting the co-ordination right is a bit of a challenge.  Like all these things, practice makes it better, but I need a fair bit of time before I am going to be able to do a Banksy on the side of the village hall.  So far, this Iron Man  is the best I can come up with - 


I have already found out that the water based paints which I have are really easy to use and clean up, but they only work on fairly absorbent surfaces like paper - on a hard surface you need to spray a bit, wait for it to dry off, then spray some more, and while waiting for it to dry you need to clean the airbrush to stop the paint drying inside (which is easy to do but tedious and wastes the paint).  I'm going to experiment with thinner-based paint and see how easy that is before re-painting my computer case with the Donald Duck picture. 

I've also discovered that the freehand work that you see people doing on Youtube is about as easy as knitting with fog underwater, and my best option is to use multiple sticky stencils - another new skill I have to learn.  I'm planning some flames on the kart side pods for next season, so now that the clock is done that will be my next focus.

And last, a quick medical update.  At long last I started the radio therapy yesterday, seven and a half weeks of going to the hospital every day, spending an hour drinking a gallon of water and three minutes in/on the radio machine.  First observations:  plain water is only interesting to fish, dogs and horses; the staff at the centre are really great, couldn't wish for any better; and while in the machine, they play music from the 1960s.  I thought this was a carefully thought out caring idea because most of their patients are aged 60 plus, but apparently they only have three CDs and this is the best of them.  Although the treatment itself only takes a few minutes, by the time I've hiked there and back its about a two and a half hour for the round trip.

I also had the last of the hormone injections today, can't say I'm sorry to see the back of them as they give me a constant dull headache, stop me sleeping properly, have added a couple of kilos to my waistline and generally make me less enthusiastic than usual. This last one should have mostly worn off by the end of October and I should gradually get back to normal after that.  With the radio therapy finishing mid-November I aim to get stuck into some fitness work after that and return to some form of martial arts training after Xmas.  Can't wait.

Next month?  Well, the airbrush will get a bit of a pasting as soon as I can get the paints organised, and I need to rebuild my desktop PC with some new go-faster guts provided by Jon - just received the memory today, but this will entail re-loading all the software so it will be probably the best part of a week loading discs and staring at the screen.  There's also the design work for the new 'Star Chess' game that OB and I have been talking about, some outside work to do in the garden before the weather closes in, and of course trekking back and forth to the hospital every day is going to limit my time a bit.


As the Honda advertisment used to say: "more forwards, please"